Web pages are usually stored on remote servers. In this activity, CoCube itself becomes a small HTTP server.
When a computer or phone is connected to the same Wi-Fi network as CoCube, you can send requests from the browser address bar to display text, turn on a pixel, or make CoCube move and turn.
This tutorial is based on the MicroBlocks Learn activity Controlling the Robot with WiFi and has been adapted for CoCube.
1. Preparation
You will need:
- One CoCube
- A computer or phone
- A 2.4 GHz Wi-Fi network
- MicroBlocks
- The Chrome or Edge web browser
The computer or phone must be connected to the same Wi-Fi network as CoCube.
In MicroBlocks, click Add Library, open Network, and select HTTP Server.
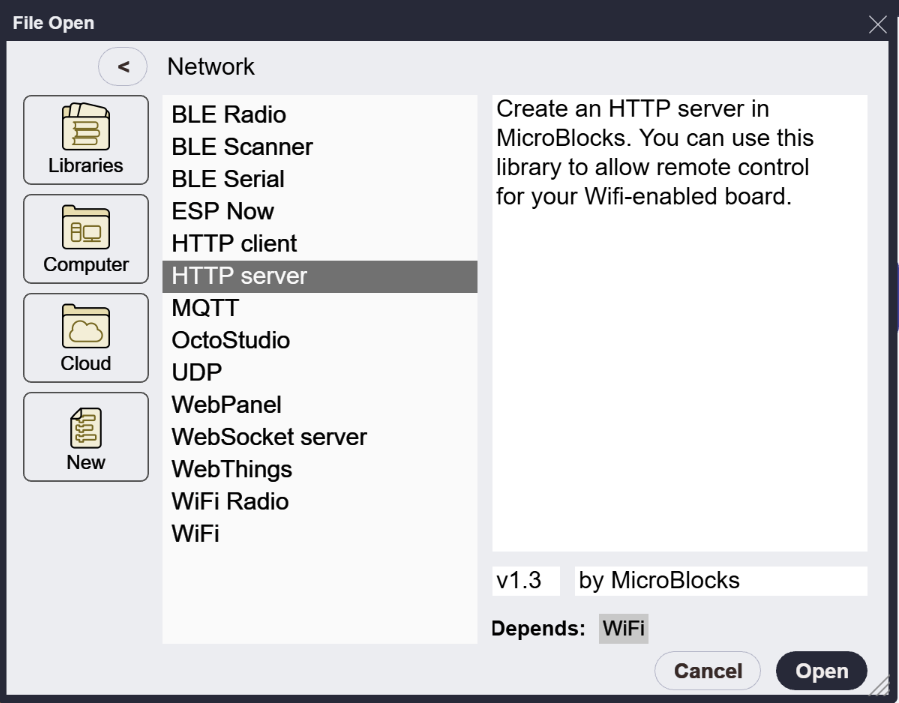
The HTTP Server library depends on the WiFi library. After adding it, you can use blocks for connecting to Wi-Fi, reading the IP address, receiving HTTP requests, and sending responses.
2. Connect CoCube to Wi-Fi
Build the following program. Replace Network name and Password with your Wi-Fi information.
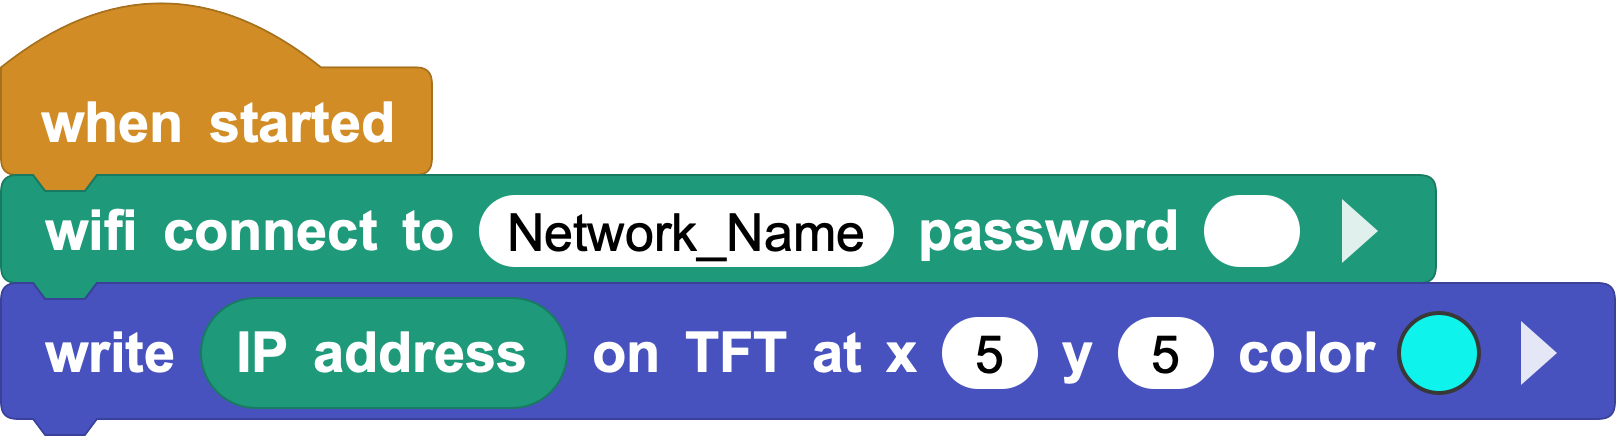
When the program starts, CoCube connects to Wi-Fi and displays its IP address on the TFT screen, for example:
172.20.10.2
The IP address is like CoCube's street address on the local network. The browser will use this address to find it.
Your CoCube may receive a different address. Always use the address shown on its TFT screen.
The Wi-Fi name and password are stored in the program. Remove your password before sharing the program or screenshots.
3. Send a browser request to CoCube
In HTTP communication, the browser is the client and CoCube is the server:
- The browser sends an HTTP request to CoCube.
- CoCube returns an HTTP response to the browser.
Build the following program:
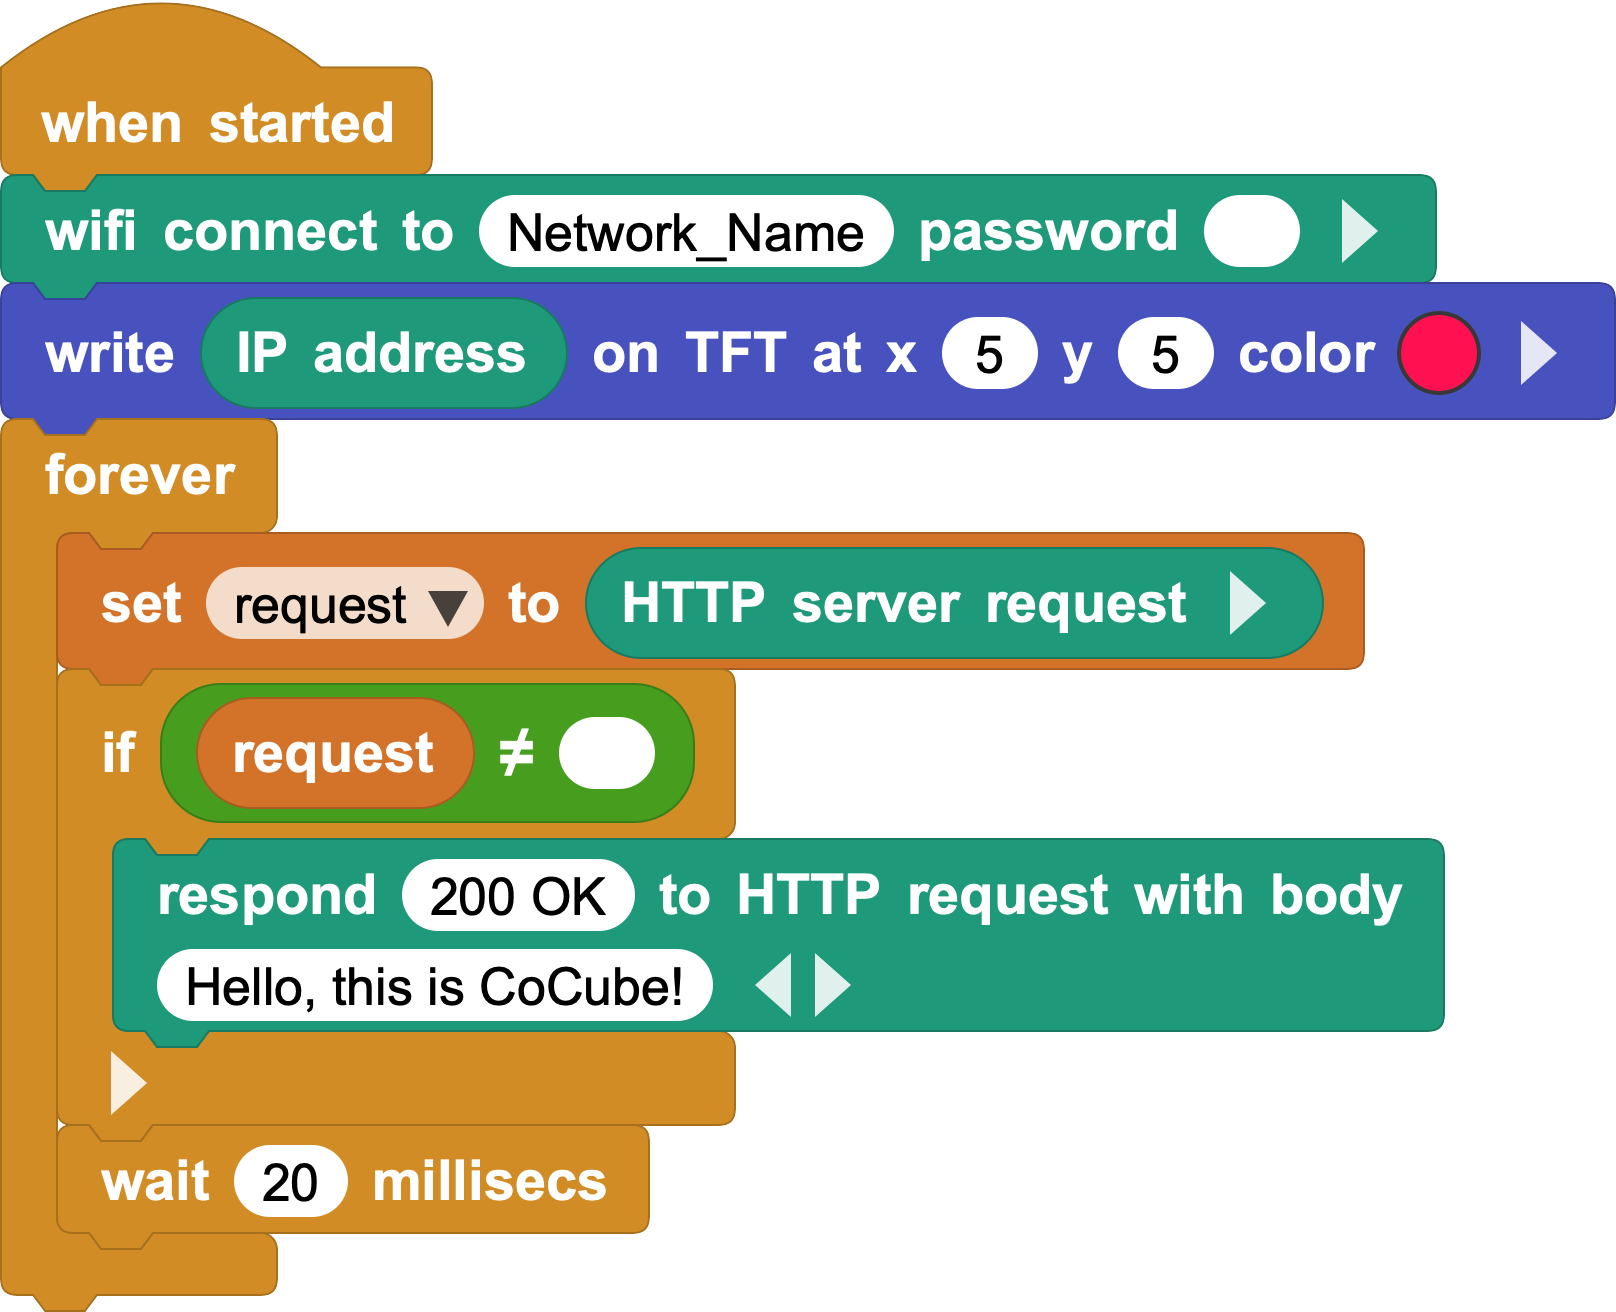
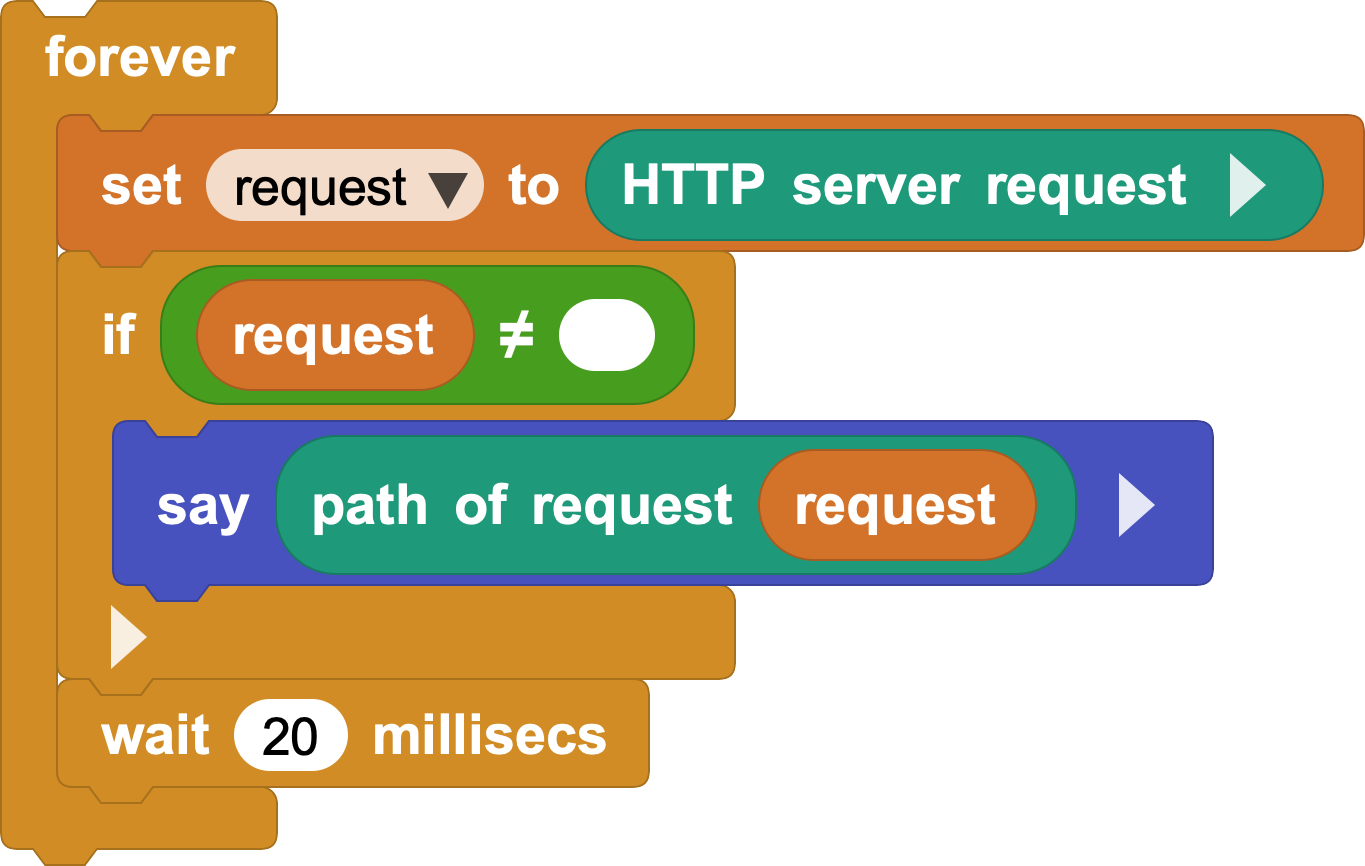
The program repeatedly reads the HTTP server request:
- When nobody is accessing CoCube, it returns an empty value.
- When a browser accesses CoCube, it returns a request.
- After receiving a request, the program responds with status
200 OKand the textHello, This is CoCube..
Enter this in the address bar of a browser on the computer or phone:
CoCube_IP_address/test
For example:
172.20.10.2/test
The browser displays the text returned by CoCube:
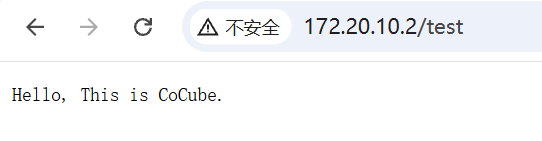
The browser may label the local http:// page as "Not secure." This experiment does not ask for an account, password, or personal information, so you can continue.
4. Understand request paths
The previous address has two parts:
| Part | Example |
|---|---|
| CoCube address | http://172.20.10.2 |
| Request path | /test |
The path is the part after the IP address that begins with /. Use the path of request block to read it.
Different addresses produce different paths:
| Browser address | Request path |
|---|---|
172.20.10.2/test |
/test |
172.20.10.2/on |
/on |
172.20.10.2/forward |
/forward |
The content of the HTTP server request block is removed after it is read. The program therefore stores it in the request variable first and then reads the path from that variable.
5. Turn a pixel on and off with a URL
Now make different paths perform different tasks:
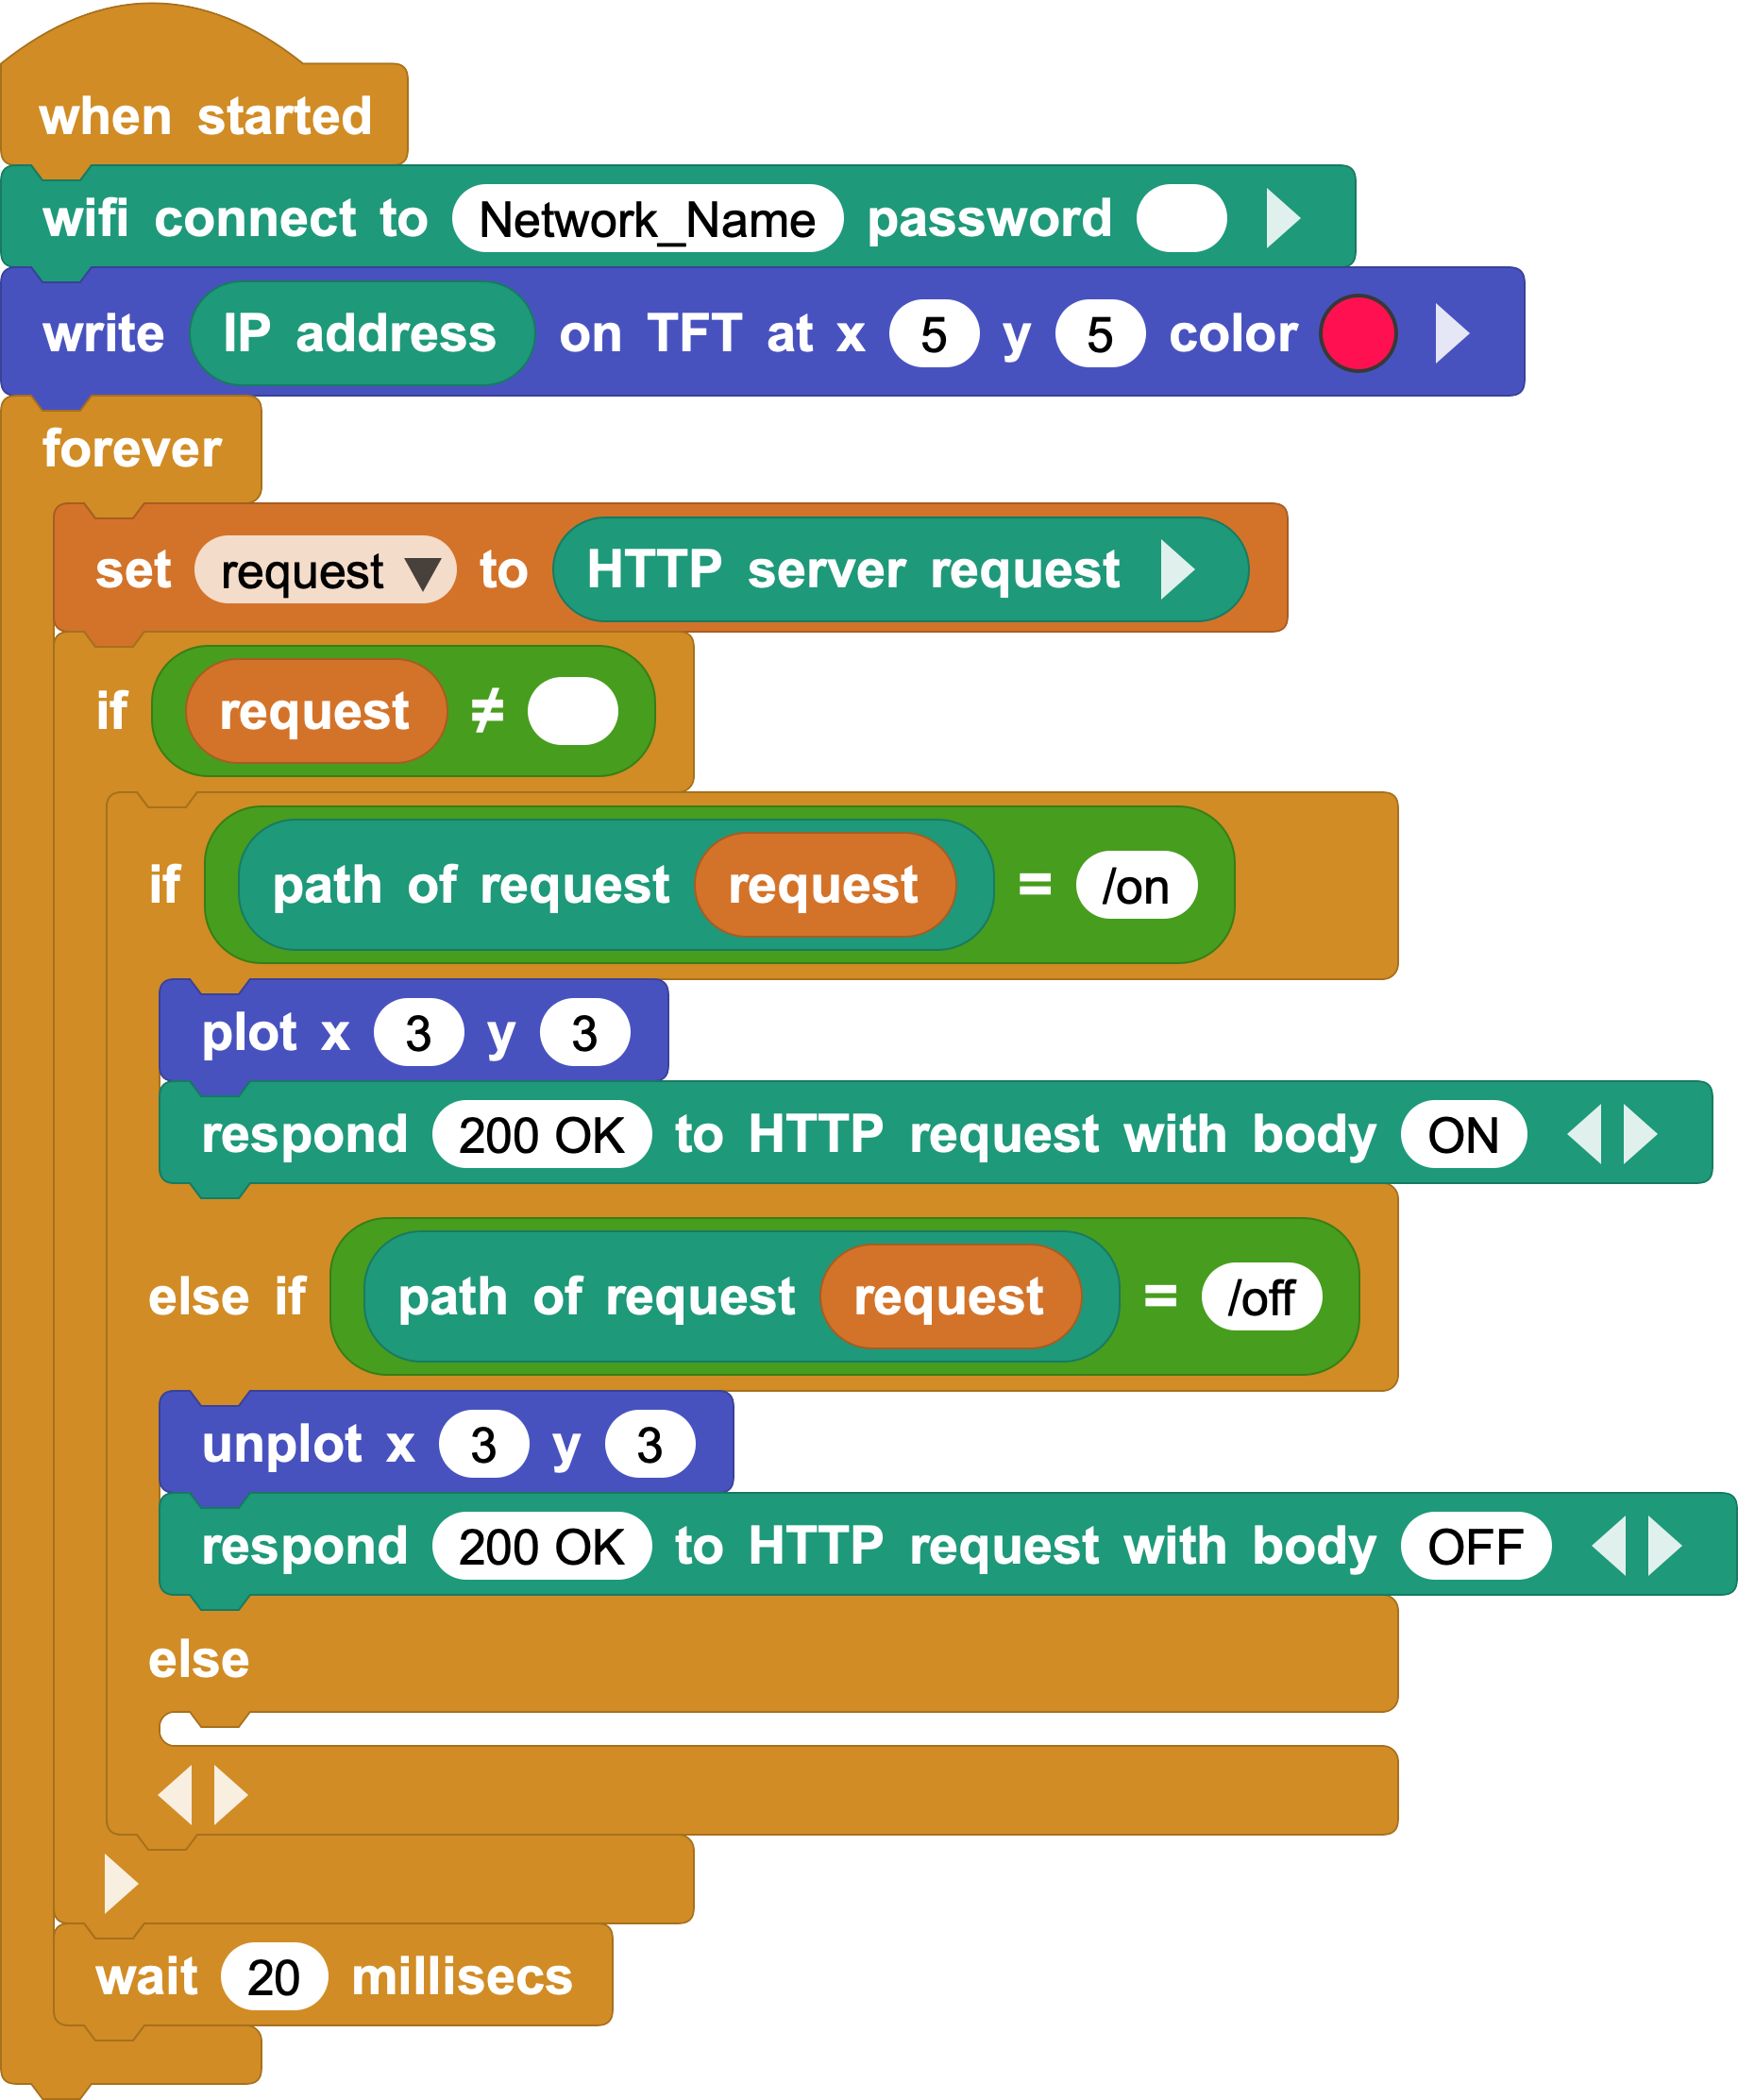
After the program receives a request:
- Path
/on: turn on the pixel at(3,3)and respond withON. - Path
/off: turn off the pixel at(3,3)and respond withOFF.
Open these addresses in the browser:
CoCube_IP_address/on
CoCube_IP_address/off
After you open /on, the browser displays ON and the pixel on CoCube turns on.
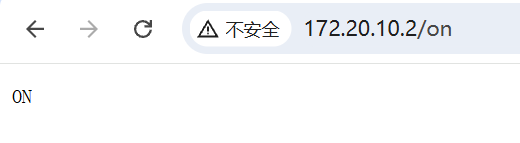
The important part is not the ON text on the page. The browser has sent a command to CoCube through the request path.
6. Control CoCube from the browser
Replace the pixel commands with robot actions to turn the browser address bar into a simple remote control.
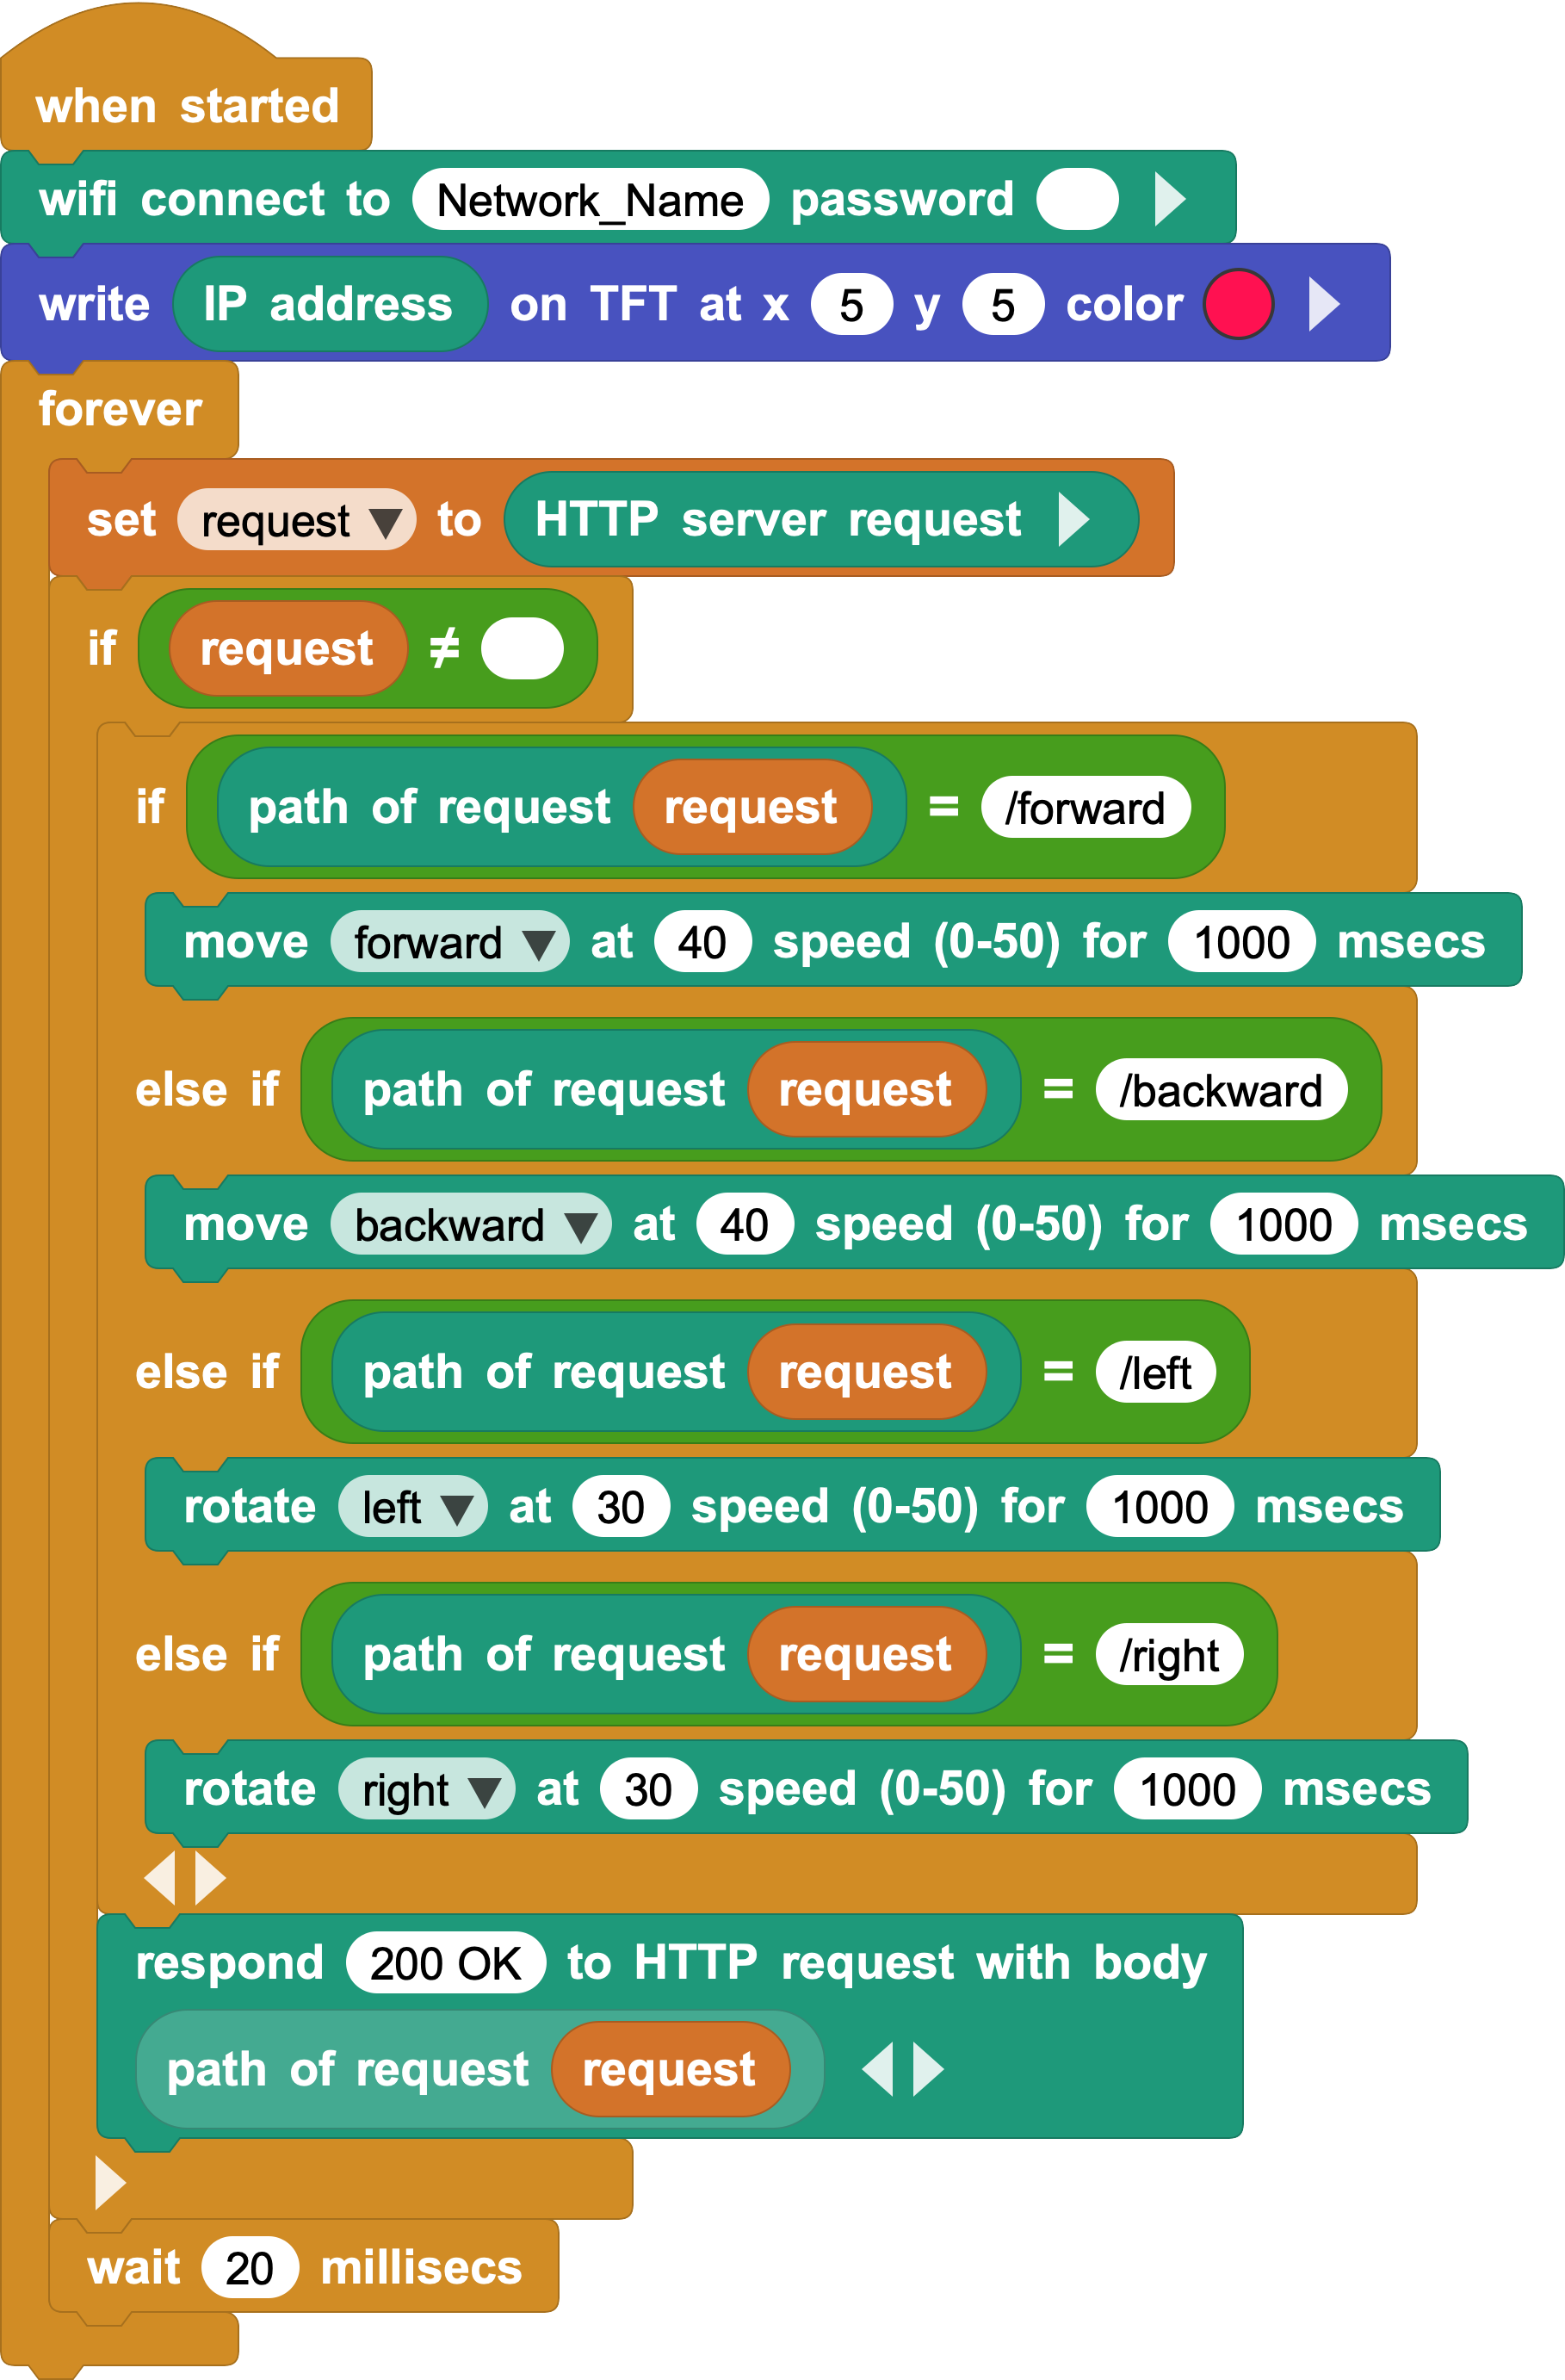
The program uses four paths:
| Request path | CoCube action |
|---|---|
/forward |
Move forward |
/backward |
Move backward |
/left |
Turn left |
/right |
Turn right |
Open these addresses one at a time:
CoCube_IP_address/forward
CoCube_IP_address/backward
CoCube_IP_address/left
CoCube_IP_address/right
For example, opening:
172.20.10.2/forward
makes CoCube move forward.
After checking the path, the program returns the received path to the browser:
| Request path | CoCube action | Browser display |
|---|---|---|
/forward |
Move forward | /forward |
/backward |
Move backward | /backward |
/left |
Turn left | /left |
/right |
Turn right | /right |
The response block is placed after the path checks. Whenever a request arrives, the browser receives a response promptly, even if the path does not match an action.
7. Troubleshooting
The browser cannot open the CoCube address
- Confirm that CoCube has connected to Wi-Fi and displays an IP address.
- Confirm that the computer or phone is connected to the same Wi-Fi network as CoCube.
- Enter
http://explicitly, nothttps://. - Check that the IP address matches the one on the TFT screen.
- Some school, hotel, and public networks isolate devices. Try a phone hotspot instead.
The browser keeps loading
- Check whether the program received an HTTP request.
- Make sure the respond to HTTP request block is after the path checks.
- Make sure the response block is still inside the condition that checks whether
requestis not empty.
The robot does not move
- The path must begin with
/. - Paths are case-sensitive:
/forwardand/Forwardare different. - Check that the CoCube motion blocks work by themselves.
8. Extension: a web remote control
Changing the browser address for every command is inconvenient. CoCube can also serve a control page with buttons.
Open the complete web remote-control program in MicroBlocks
Enter the Wi-Fi name and password in the complete program and run it. On a phone or computer, open the IP address shown on the CoCube screen. Hold a direction button to move the robot and release it to stop. The page also updates the CoCube position and direction automatically.
This program includes HTML, CSS, and JavaScript and is more complex than the previous examples. You do not need to understand all of it yet. Its core still uses the HTTP requests from this lesson:
| Request path | Action |
|---|---|
/forward |
Move forward |
/backward |
Move backward |
/left |
Turn left |
/right |
Turn right |
/stop |
Stop the wheels |
/position |
Read the position and direction |
The web page replaces manually typed addresses with buttons. Pressing a button sends a movement request, and releasing it sends /stop. This is the basic idea behind controlling a robot from a web page.