MQTT is a lightweight communication protocol for IoT projects. In this tutorial, you will connect CoCube and the computer to the same MQTT server and complete two tasks:
- The computer sends text to CoCube, and CoCube displays the text on the TFT screen.
- CoCube sends its
xandycoordinates and heading to the computer.
After completing this project, CoCube and the computer will be able to exchange messages through MQTT whenever both can access the Internet, even when they are not on the same local network.
1. Preparation
You will need:
- A CoCube robot
- A computer capable of running MicroBlocks
- A 2.4 GHz Wi-Fi network
- The MQTTX web client or desktop client
Open the following website to use the MQTTX web client directly:
This tutorial uses the public MQTT broker provided by EMQX. Public brokers are suitable for classroom experiments, but don't send Wi-Fi passwords, personal information, or other sensitive content.
2. How MQTT delivers messages
There are three important roles in MQTT communication:
- Broker: Receives for receiving and forwarding messages. This tutorial uses
broker.emqx.io. - Publisher: Sends messages to a topic.
- Subscriber: Subscribes to a topic and receive messages in the topic.
A topic is like a message channel. A message is delivered only when the publisher and subscriber use the same topic.
This project uses the following topics:
| Topic | Message Direction | Content |
|---|---|---|
cocube/control |
Computer → CoCube | Text to display |
cocube/x |
CoCube → Computer | x coordinate |
cocube/y |
CoCube → Computer | y coordinate |
cocube/direction |
CoCube → Computer | Heading |
broker.emqx.iois a public server. When multiple people usecocube/controlat the same time, they may receive messages from others. For classroom use, add the class or device name, such ascocube/class1/eow/control, and use the same modified topic in both MicroBlocks and MQTTX.
3. Add the MQTT block library
Open MicroBlocks, connect CoCube, and open the Add Library window:
- Select Network.
- Find
MQTT. - Click Open.
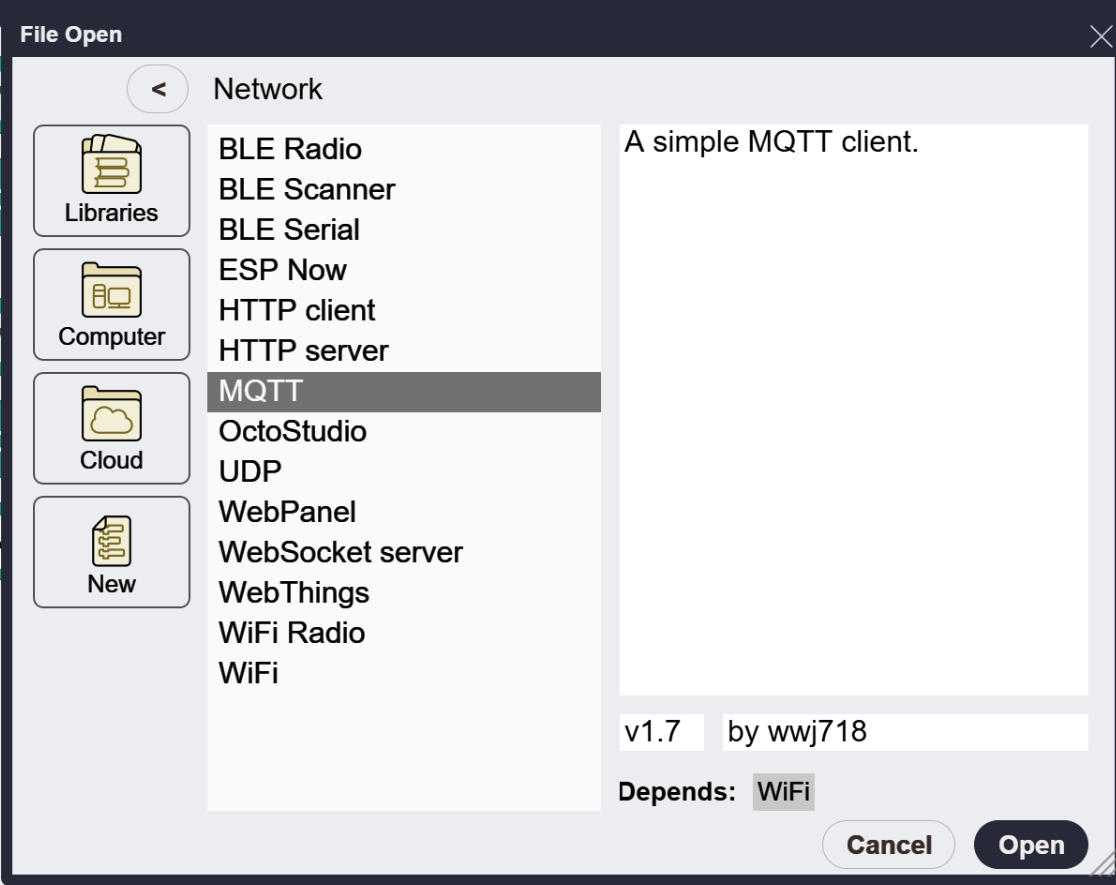
The MQTT library depends on the Wi-Fi library. After adding it, you can find blocks such as connecting to the server, subscribing to topics, publishing messages, and reading events in the block palette.
4. Connect to Wi-Fi and MQTT server
Build the following program:
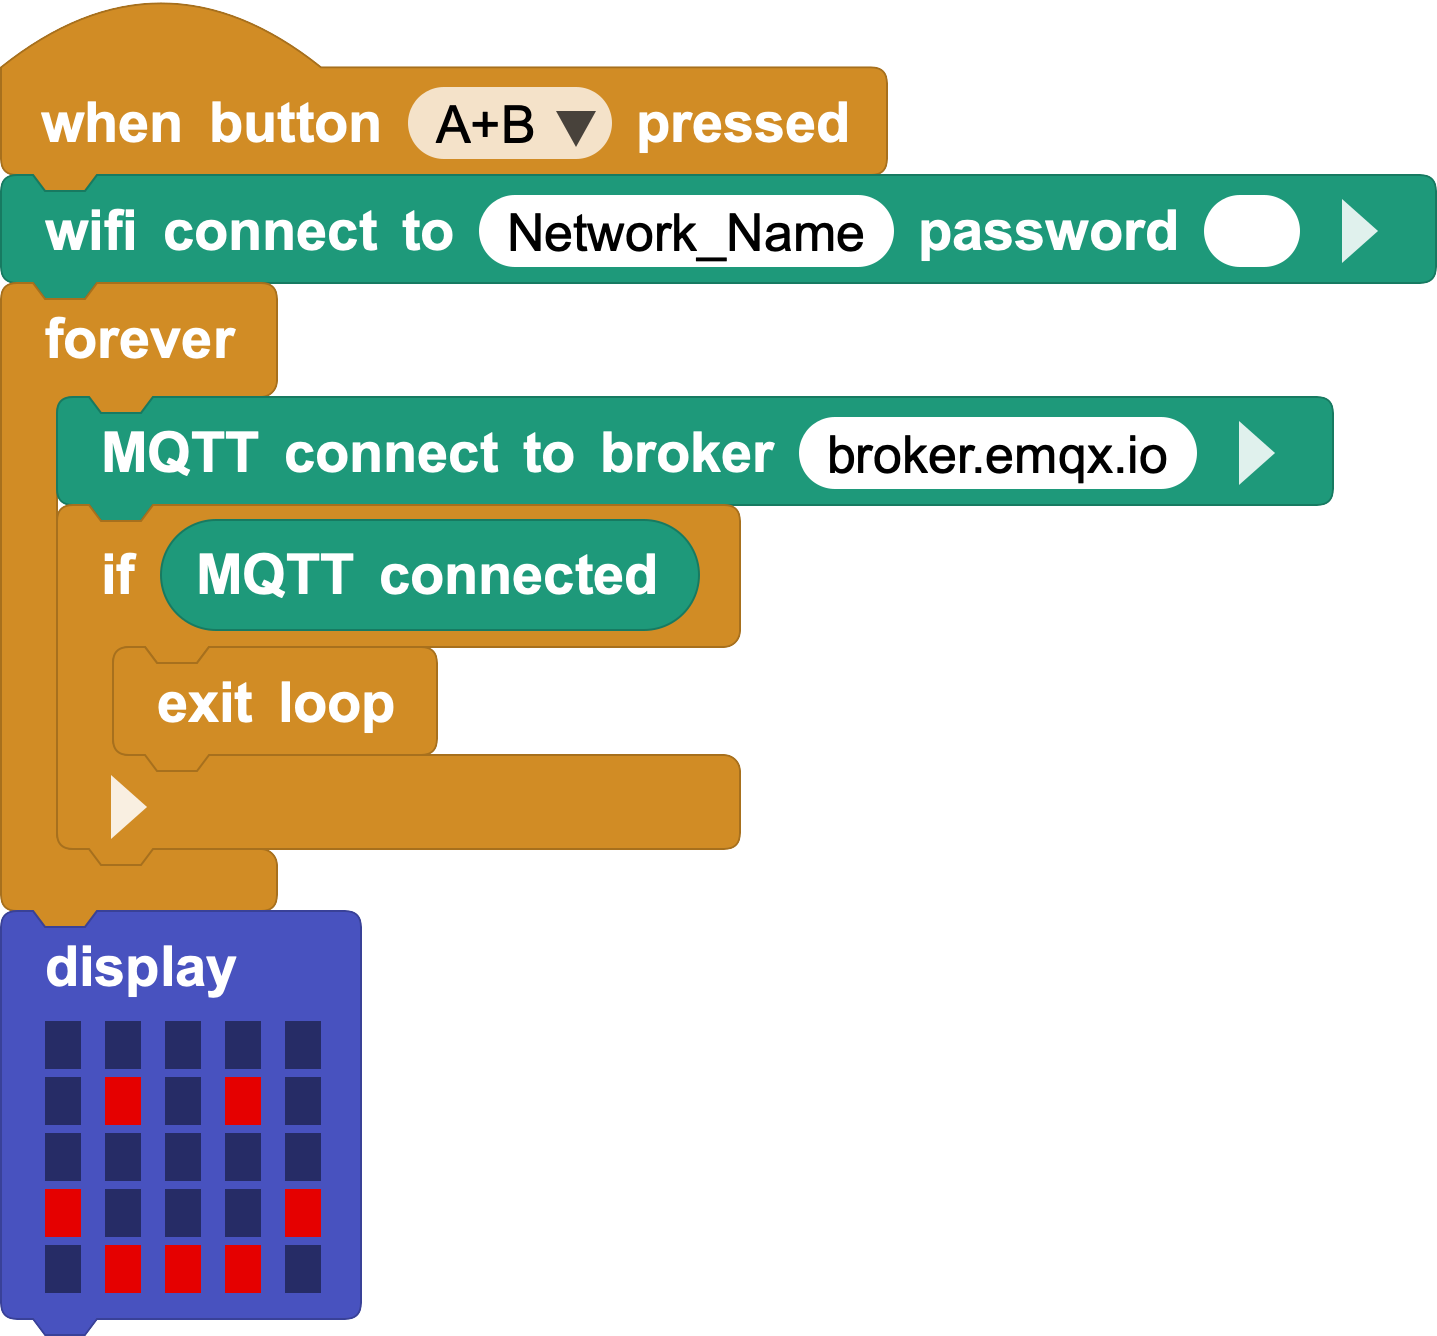
Replace "Network Name" and "Password" with your Wi-Fi information. The program runs as follows:
- Press the A and B buttons of CoCube at the same time.
- CoCube connects to Wi-Fi.
- The program tries to connect to the MQTT server
broker.emqx.io. - When the connection succeeds, the loop exits and CoCube displays a smiley face.
The smiley face confirms that CoCube is connected to the MQTT server.
5. Send a message to CoCube from your computer
5.1 Subscribe CoCube to the control topic
Build the following program:
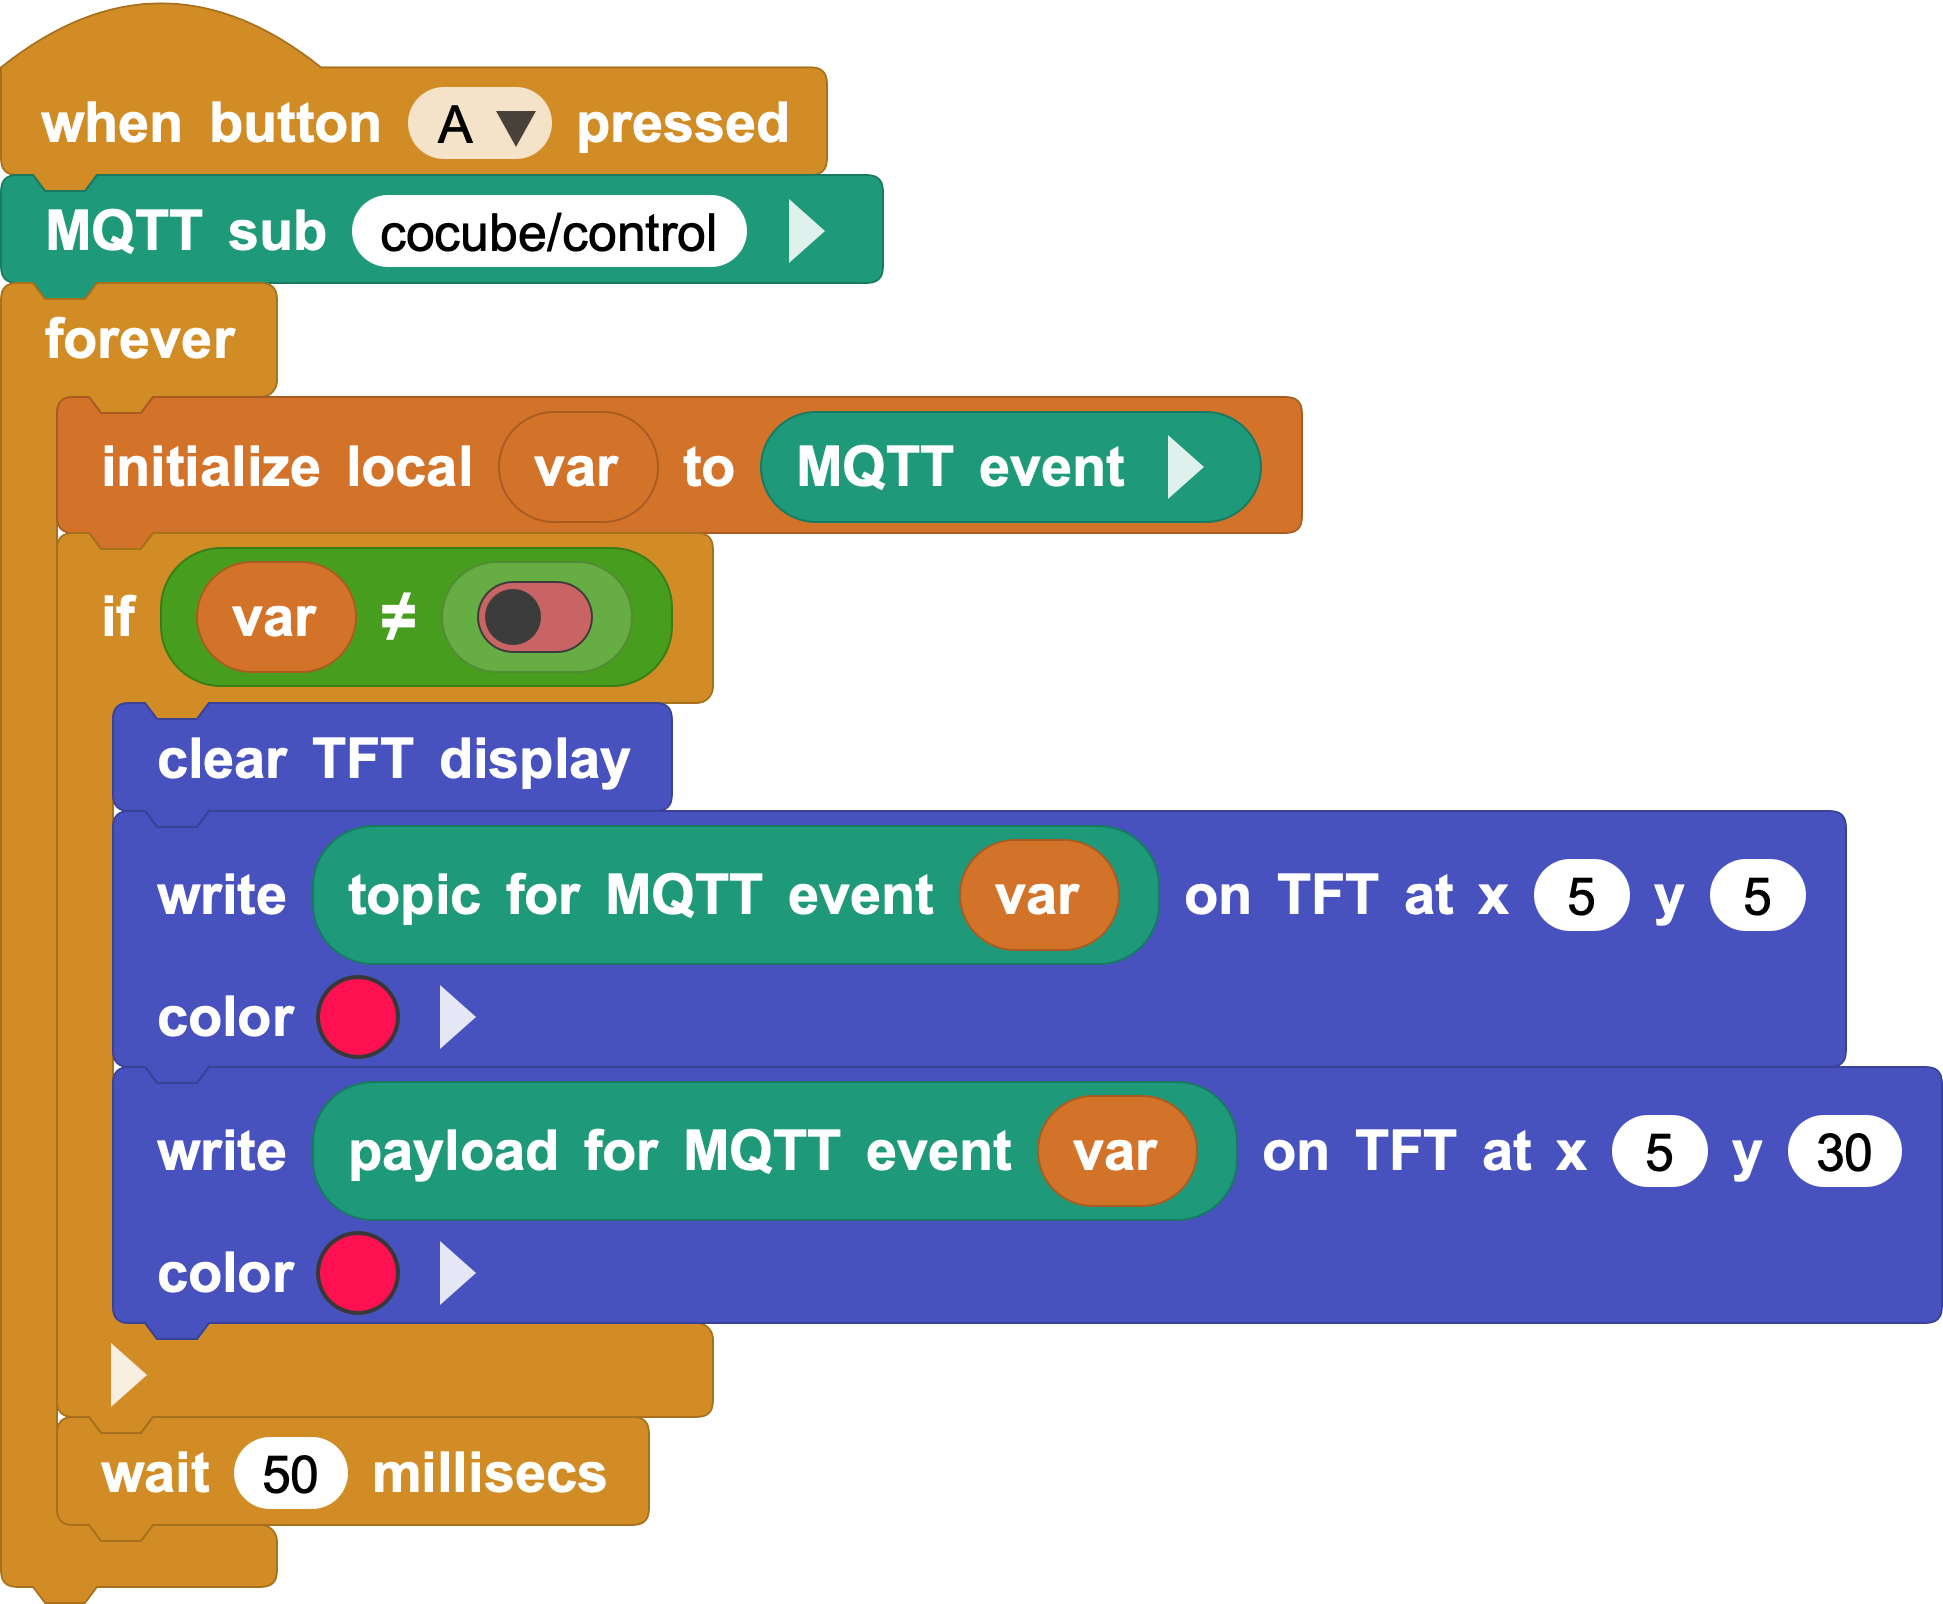
After pressing button A, CoCube subscribes to the topic:
cocube/control
The program then checks for MQTT events every 50 milliseconds. When a new message is received it will:
- Clear the TFT screen.
- Show which topic the message comes from.
- Display the message content of the message.
topic for MQTT event reads the topic, and payload for MQTT event reads the message content. The payload is the actual data carried by the message.
5.2 Connect MQTTX
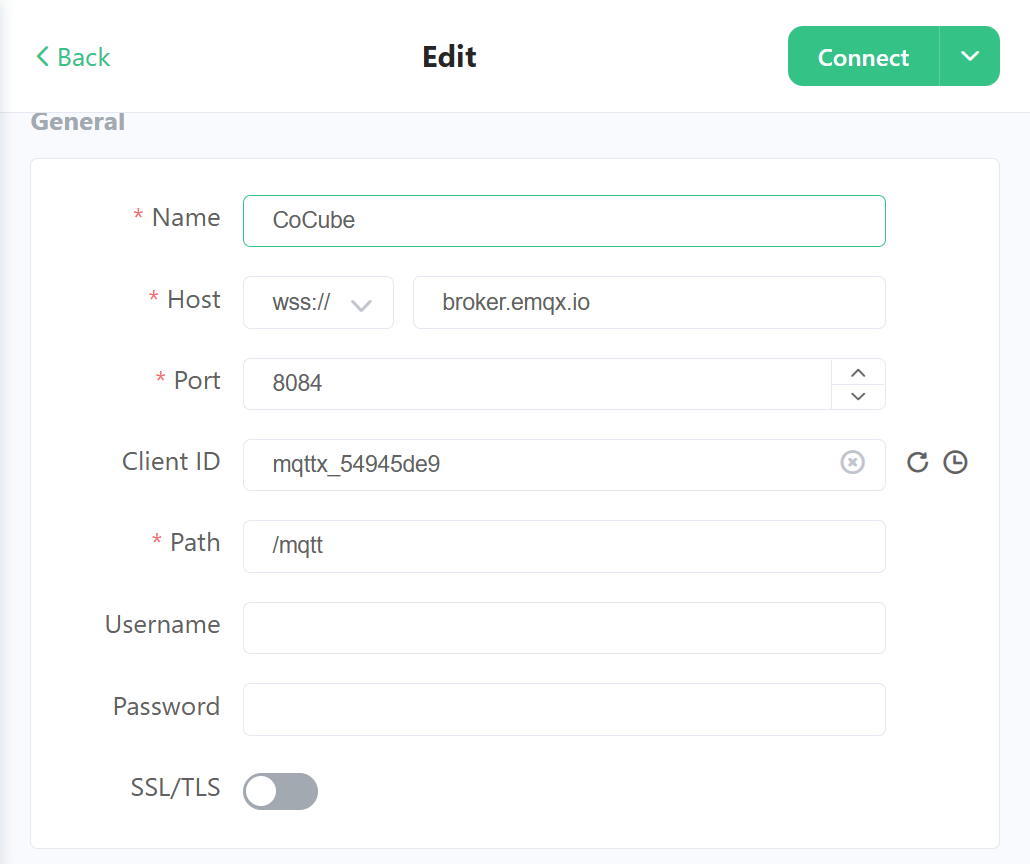
Create a new connection in MQTTX. You can choose any connection name, for example:
| Settings | Content |
|---|---|
| Name | CoCube |
Leave the remaining settings at their defaults and click Connect.
5.3 Send the first message
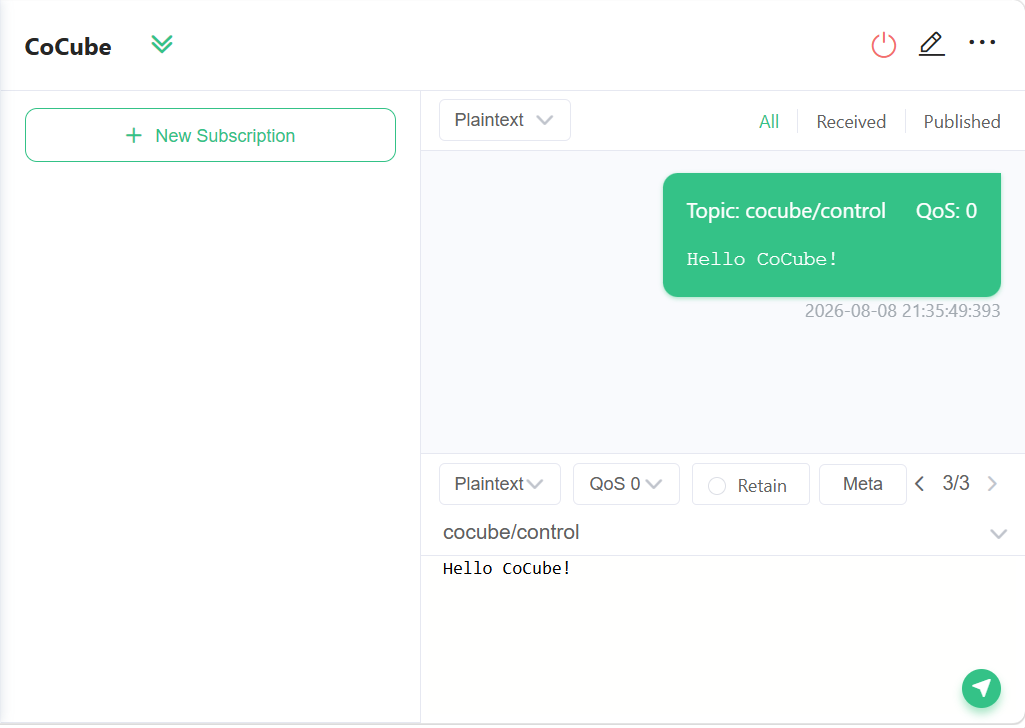
Make sure you have pressed button A on CoCube so that it has started subscribing. At the bottom of MQTTX, select Plaintext, then enter the topic and message:
Topic: cocube/control
Message: Hello CoCube!
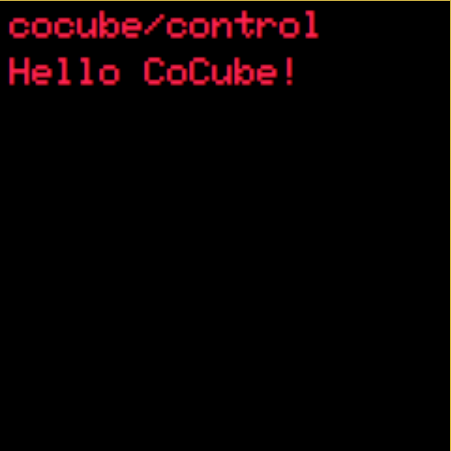
Click the send button in the lower-right corner. CoCube will display the topic and Hello CoCube! on its TFT screen.
6. Send CoCube position data to the computer
Place the CoCube robot on the CoMap. The following program will publish the CoCube's position and heading respectively when the B key is pressed:
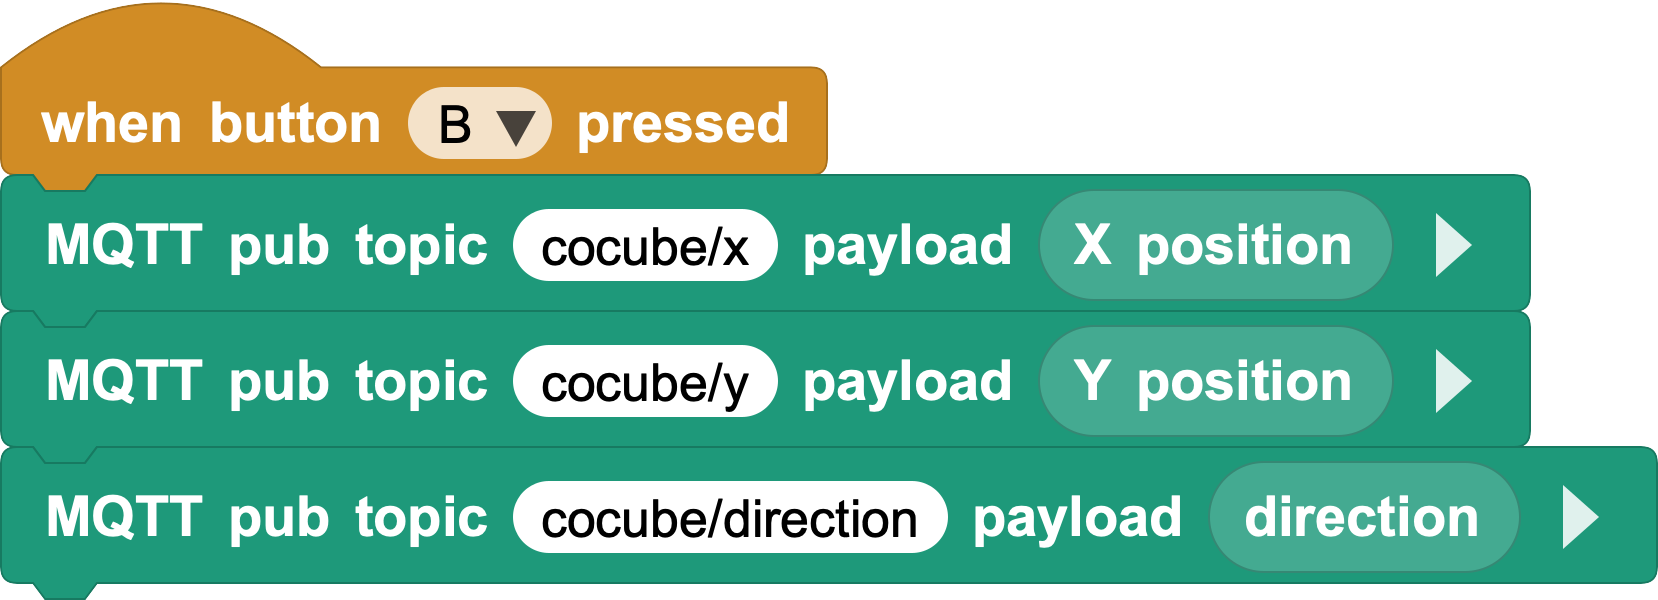
Three messages are sent to:
cocube/x
cocube/y
cocube/direction
6.1 Subscribe to topics in MQTTX
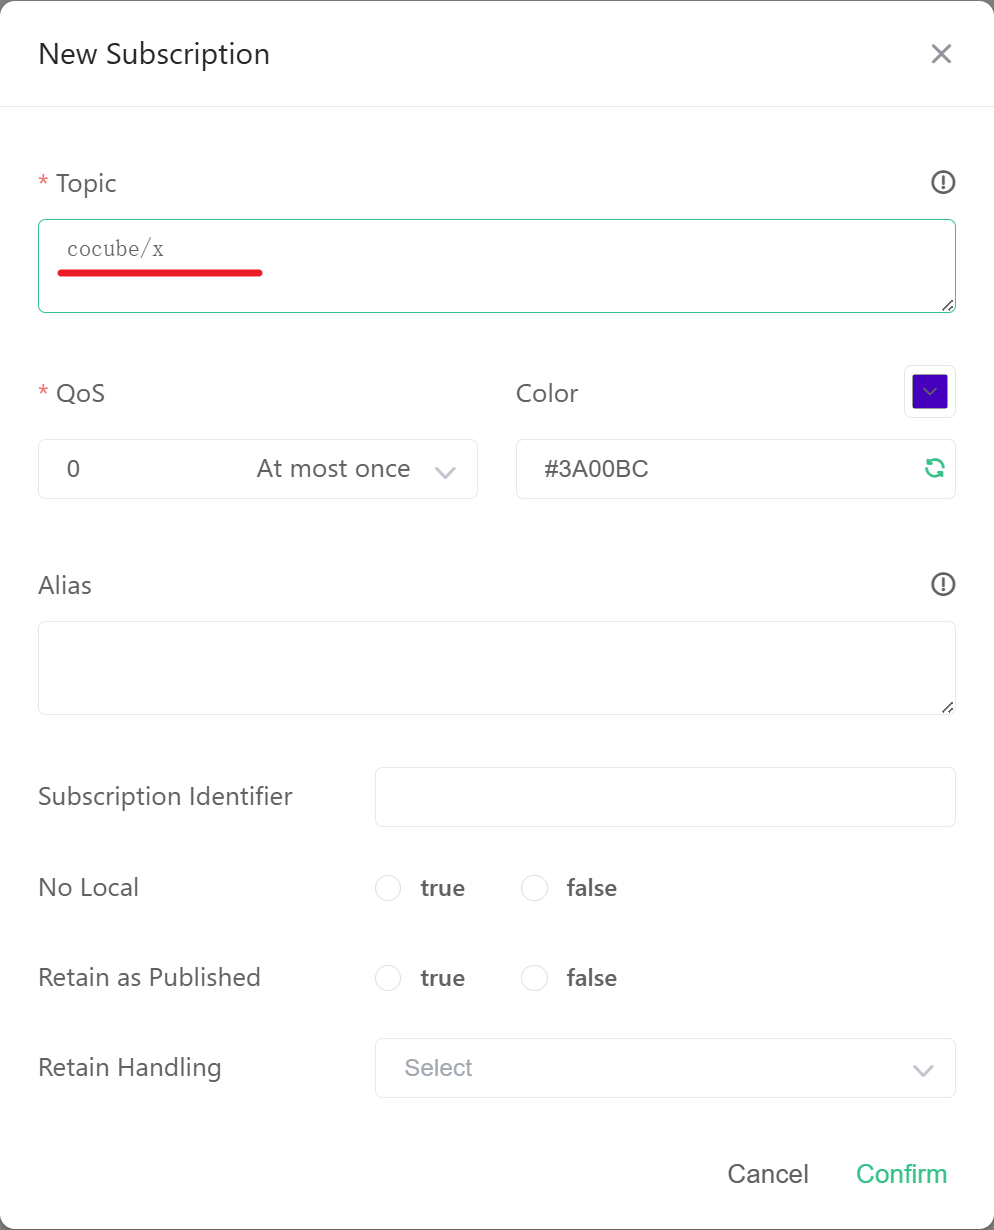
Click New Subscription, enter cocube/x, then click Confirm.
Continue subscribing using the same method:
cocube/y
cocube/direction
By pressing CoCube's B key, MQTTX will receive three messages.
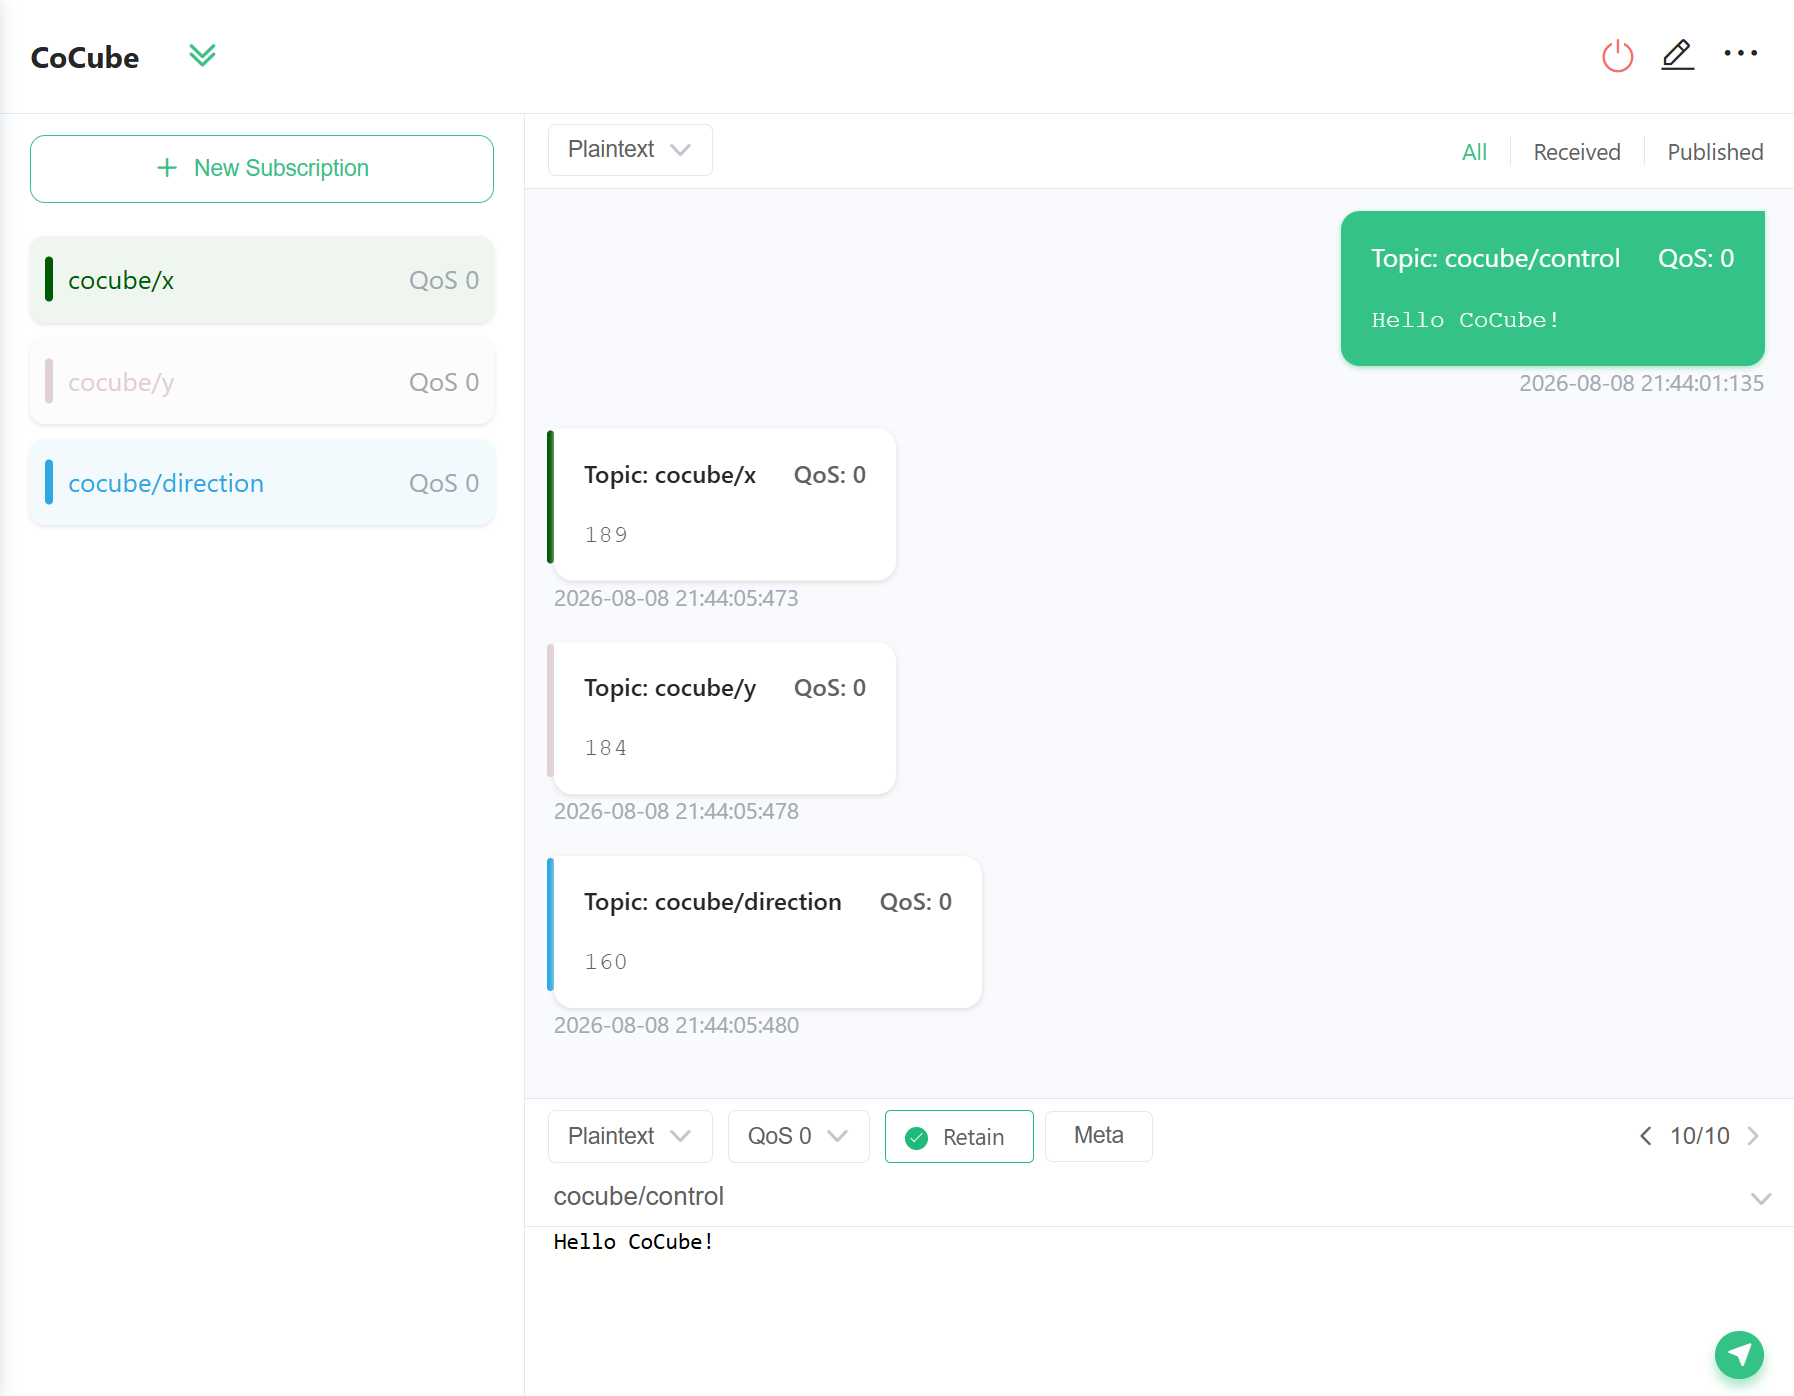
You can also subscribe to the following wildcard topic to receive these three subtopics at once:
cocube/+
The notation + means "match any name in this layer". Therefore, cocube/+ can match cocube/x, cocube/y, and cocube/direction.
7. Complete workflow
When testing for the first time, follow the sequence below:
- Run all programs in MicroBlocks.
- Press the A and B keys simultaneously to connect to the Wi-Fi and MQTT server.
- Wait for the CoCube to display the smiley face pattern.
- Press the A key to subscribe CoCube to
cocube/control. - Send
Hello CoCube!in MQTTX. - Subscribe to three location topics in MQTTX, or subscribe to
cocube/+directly. - Press the B key to view the location data sent by CoCube.
8. FAQ
CoCube does not display smiley faces
- Confirm that the Wi-Fi name and password are correct.
- Confirm you are using 2.4 GHz Wi-Fi.
- Confirm that the current network can access the Internet.
- Some campus or hotel networks require web page authentication, and CoCube cannot directly connect to such networks.
MQTTX cannot connect
- Check if the server address is
broker.emqx.io. - You can try again later, public servers occasionally experience brief congestion.
CoCube cannot receive messages from the computer
- Make sure CoCube has a smiley face on it, then press A to subscribe.
- Check that the topics on both ends are exactly the same.
- MQTT topics are case-sensitive,
cocube/controlandCoCube/controlare not the same. - If your own topic prefix is used, both ends must modify it at the same time.
MQTTX cannot receive location data
- Confirm that you have subscribed to
cocube/x,cocube/y,cocube/directionorcocube/+. - Confirm that CoCube is connected to the server and press the B key again.
- Check if the CoCube is in a position where it can read the map coordinates.
9. Next challenges
After completing basic communication, you can try:
- Let CoCube automatically publish the location every 1 second.
- Send
forward,backward,left,rightand other messages to control CoCube movement. - Assign different theme prefixes to multiple CoCubes to view and control them separately.
MQTT can do much more than send a piece of text. Once the topic and message format are agreed upon, web pages, Python programs, phones, and robots can work together through the same MQTT broker.