1. Goal
Want to make a fun little game for your robot? You may have played the classic game Flappy Bird. The rules are simple, but it really tests your reaction speed. In this activity, you will use the robot screen to build a simple Flappy Bird style game and learn the whole process from drawing the screen to implementing the game logic.
2. Materials

3. Software
4. Background
Key Parts of a Flappy Bird Game
Build a clear game scene.
Make pipes appear and move.
Control the character so it keeps jumping.
Design a scoring system.
Think: What is the key to flying through the pipes? What systems do we need, and how should we design them?
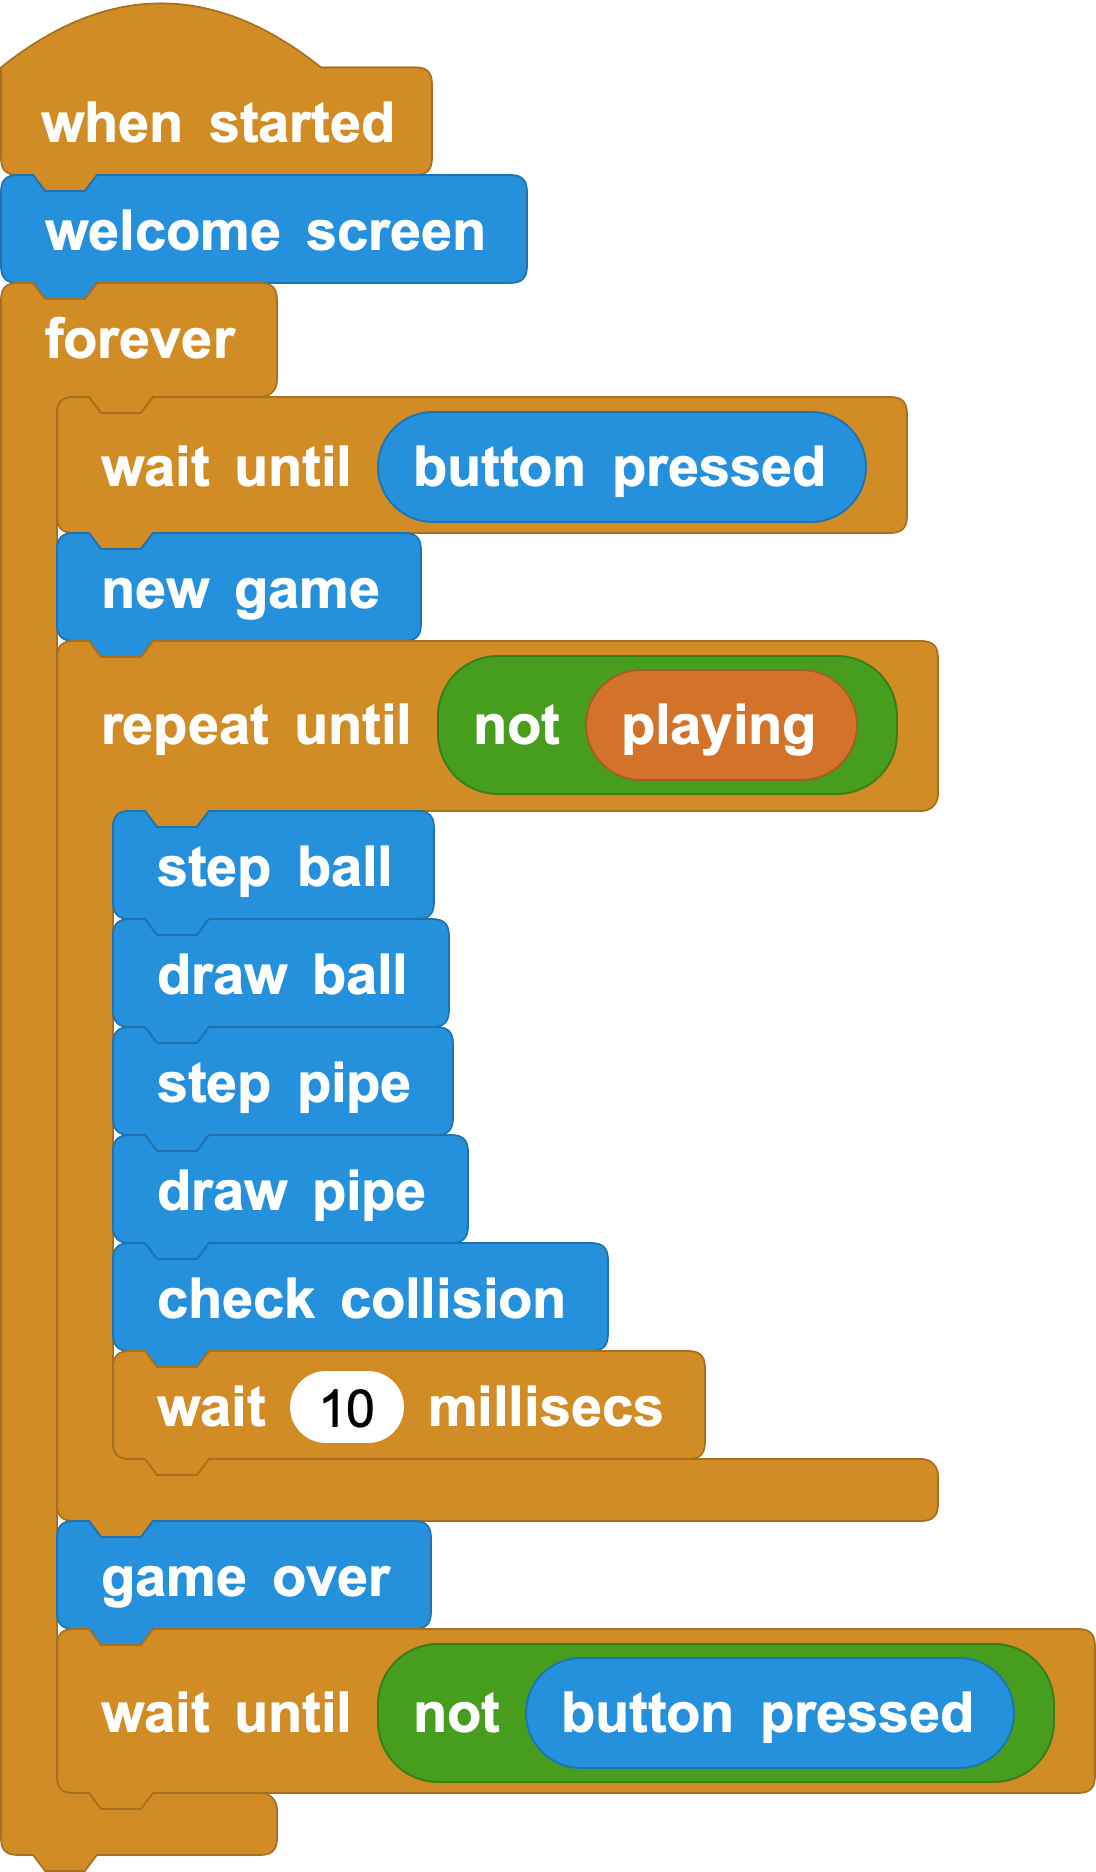
State switching: Define the start screen, playing state, and game-over screen. Control the transition between them.
Main loop: While the game is running, update the picture and the logic repeatedly.
Rules and detection: Add scoring, collision detection, and boundary checks that end the game.
Blocks You Will Use
Core blocks: In this activity, we mainly use blocks from the TFT library. Screen display is needed for the interface, the character, and the moving game elements, so TFT is the main library for this game.

This block has 5 important inputs:
Text: The text to display. You can also use a variable.
x / y position: The coordinates of the upper-left corner.
Color: The text color.
Scale: The size ratio of the text. Click the small white triangle to see this input. A value of 1 means one pixel is used as the smallest unit, while 60 means the text uses 60 pixels as one unit.
We also need two blocks for drawing shapes: rectangle and circle.


5. Design a Text Tool
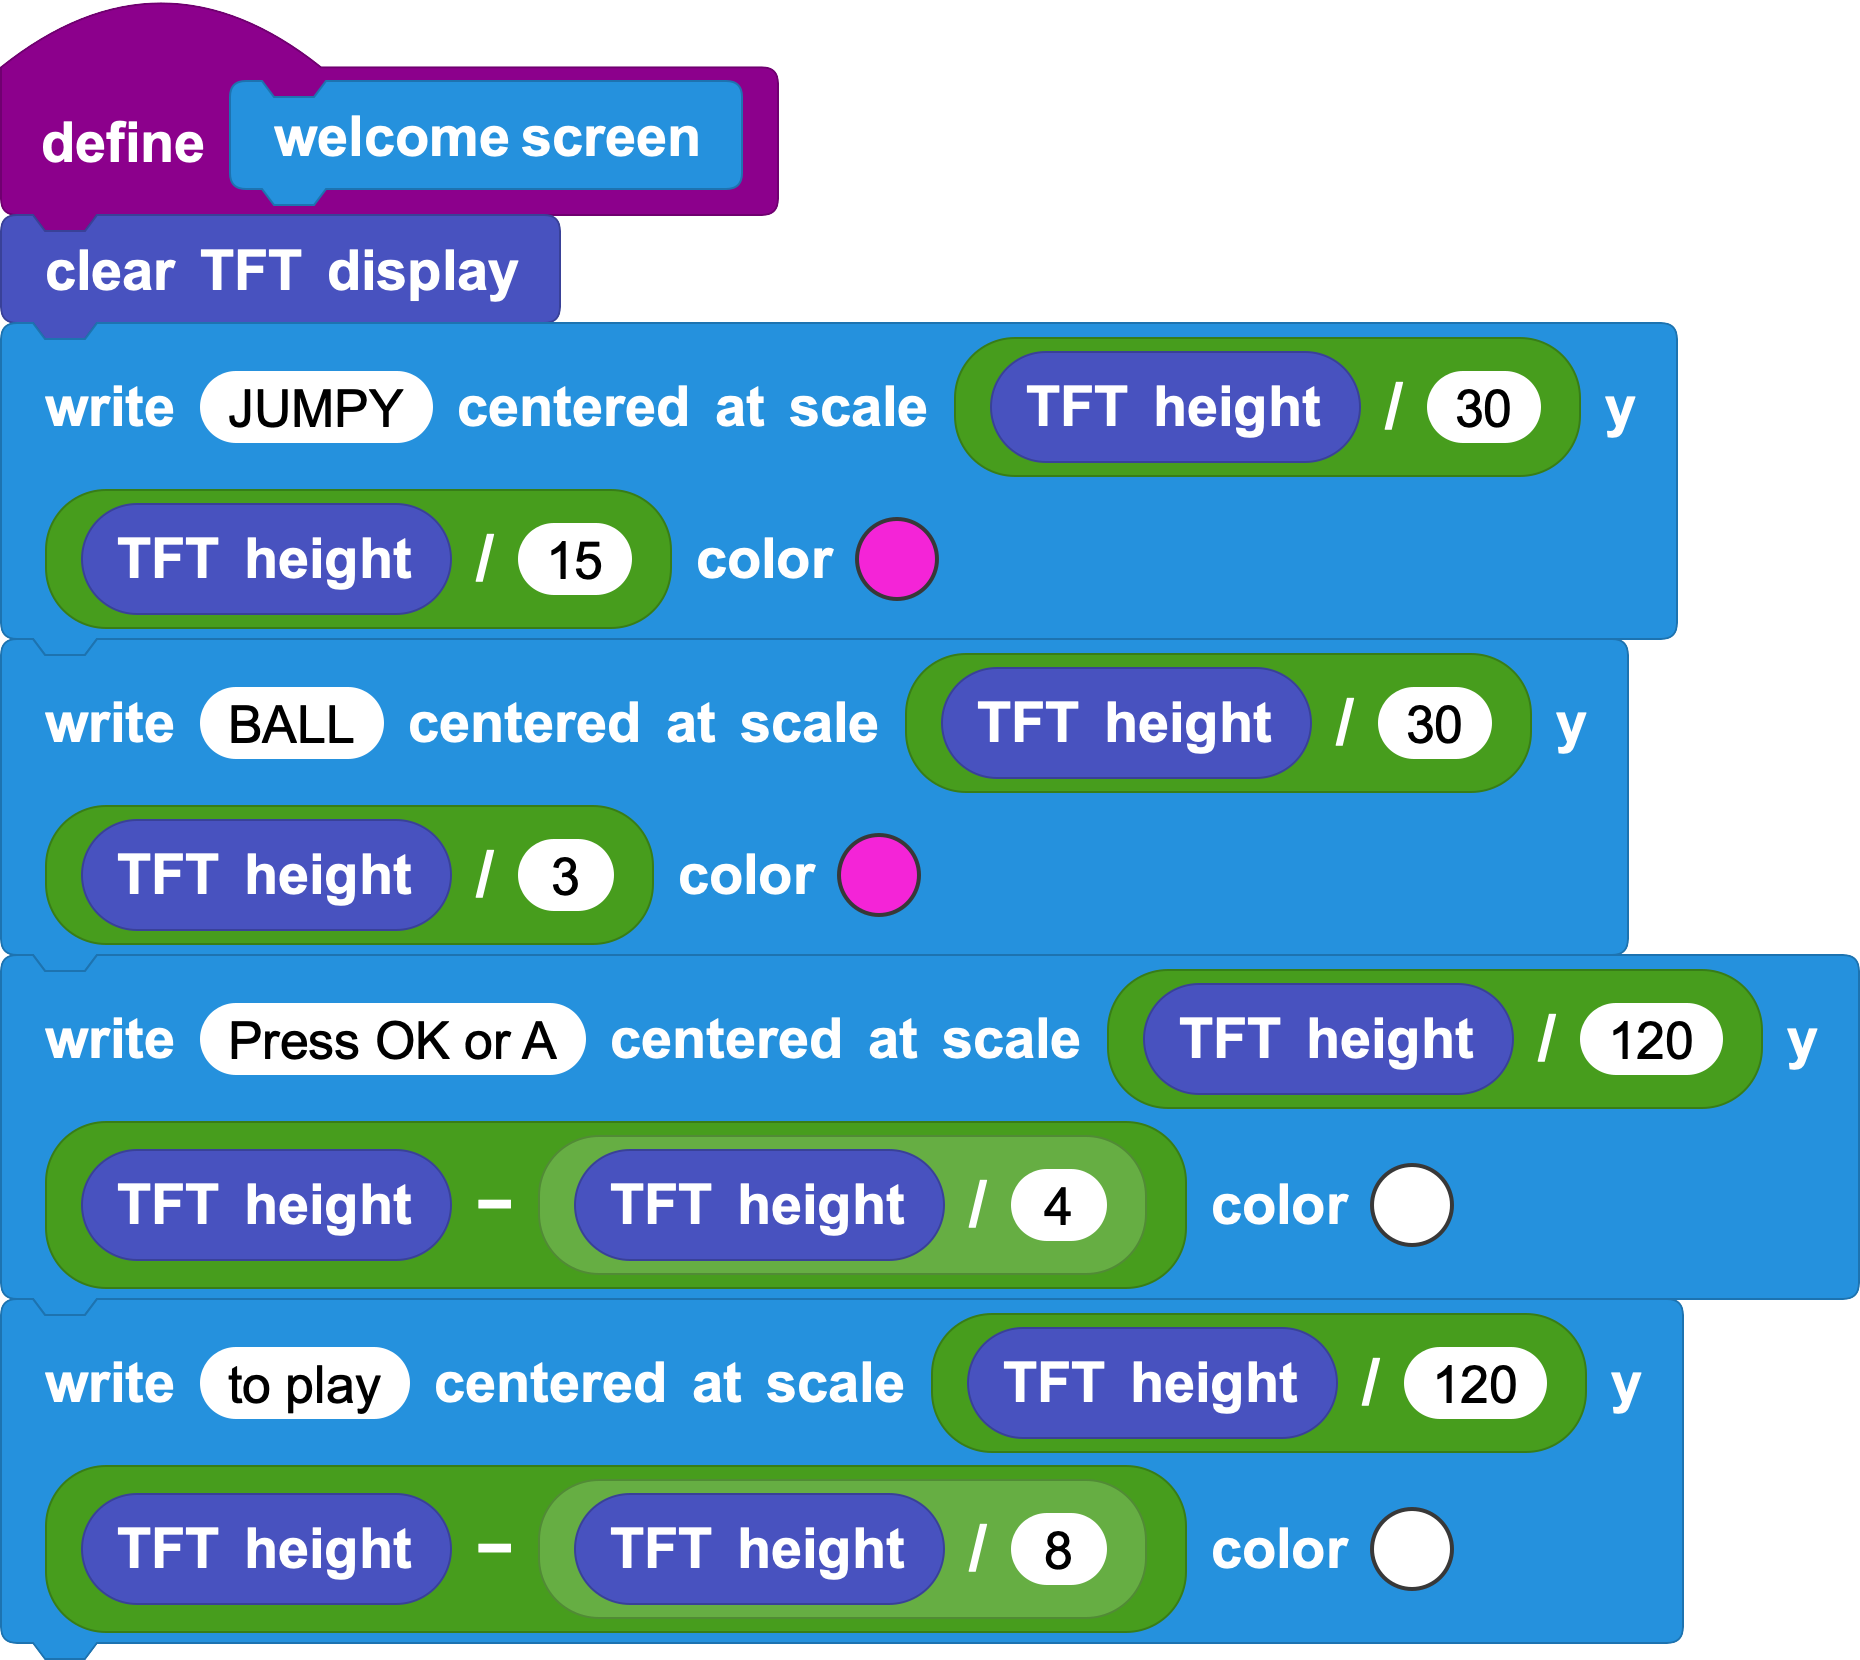
- Drawing text: The start screen and game-over screen both use text. If we set the size, color, and position every time, the work becomes repetitive and easy to get wrong. We can make a custom text block, a small text tool, so we can reuse the same style.

By calling this custom block with different inputs, we can write different text on the screen.

In this text tool, the x position is centered. Why should the width variable be calculated this way?
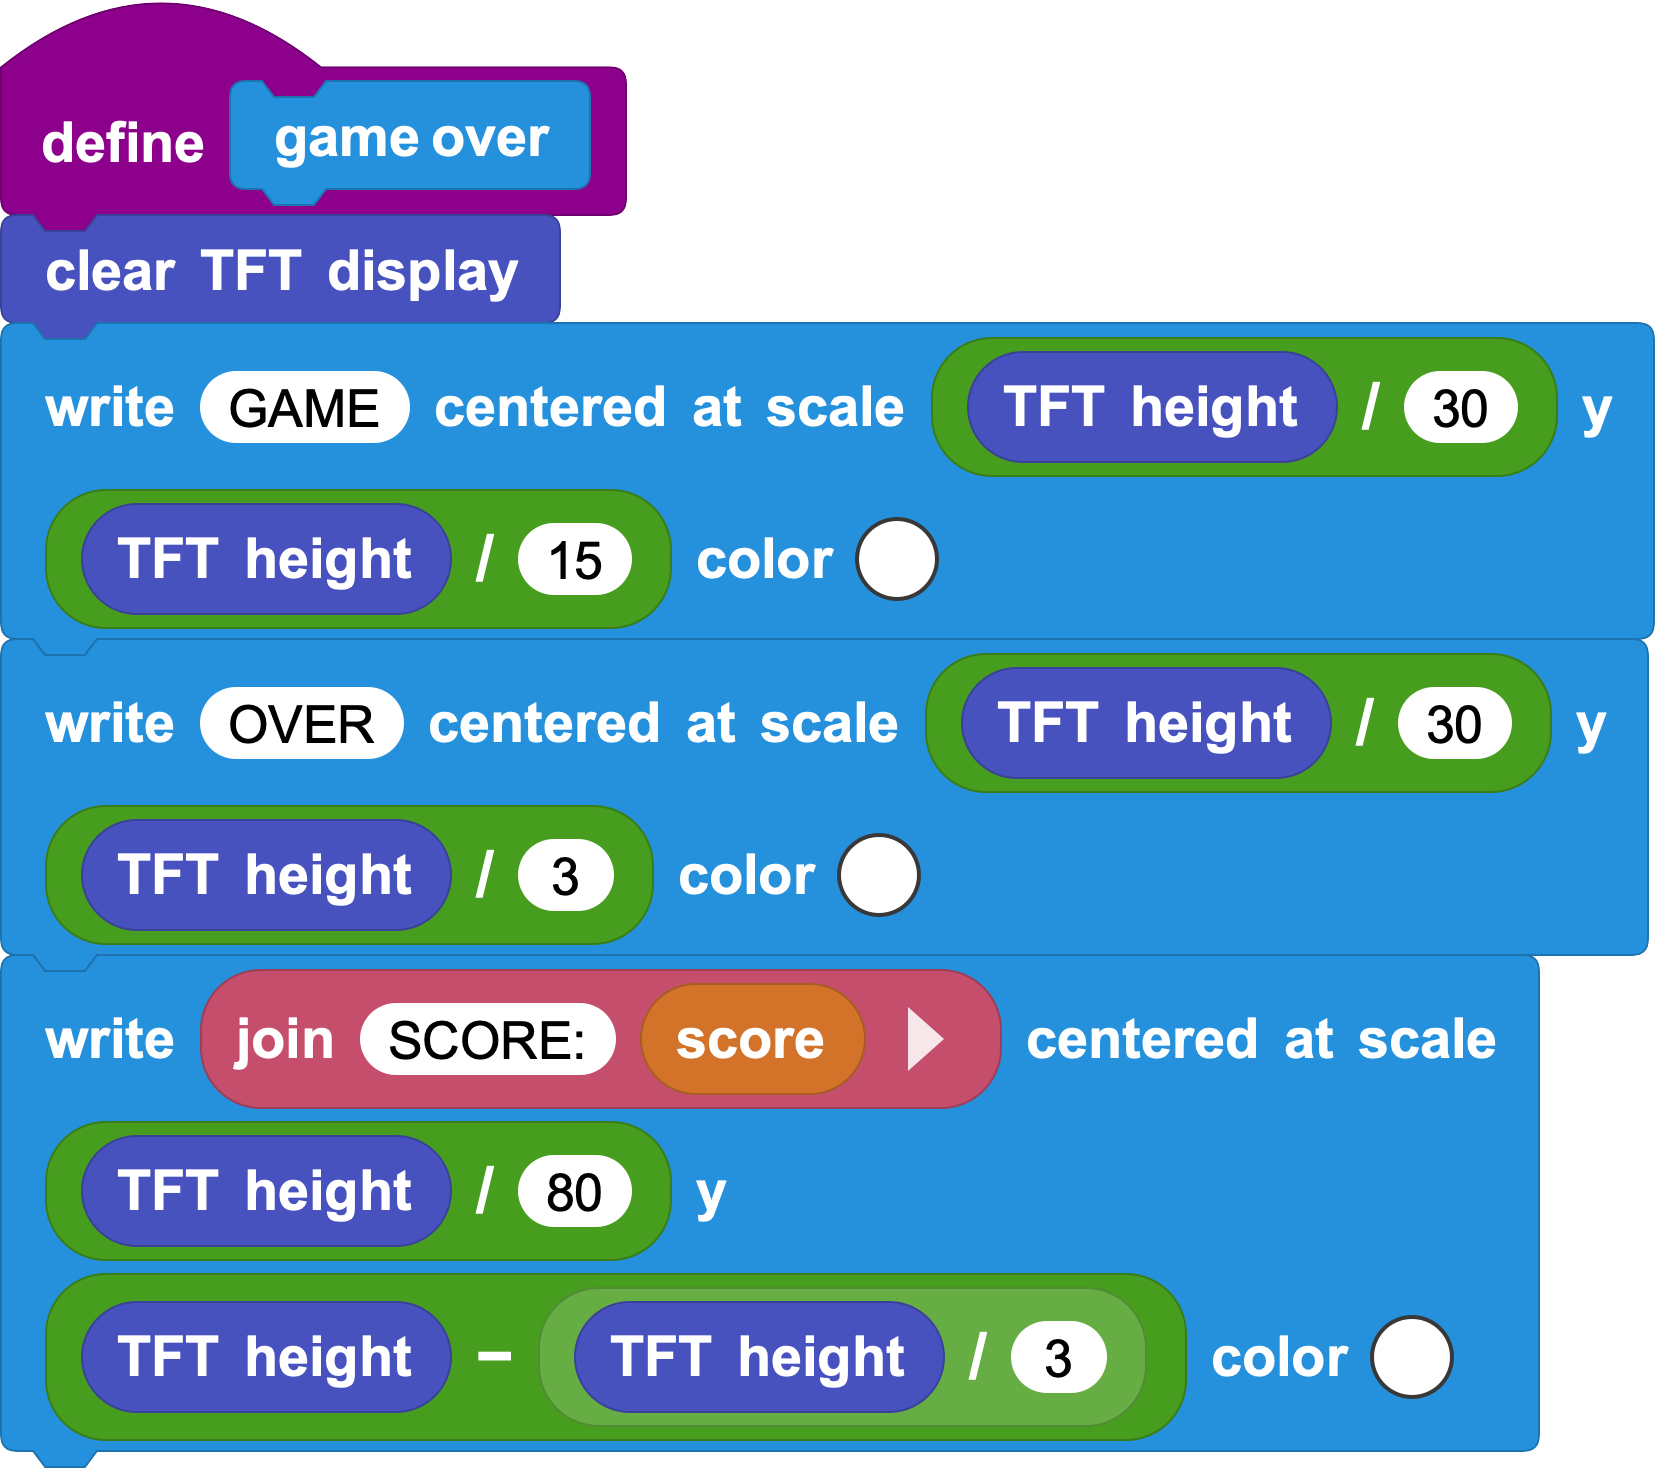
- Drawing screens: After this custom text block is ready, drawing the start and game-over screens becomes easier. We call the block and enter the text we want to show, which keeps the style consistent.
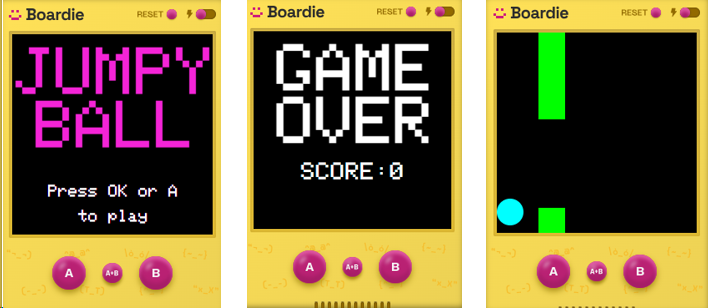
On the start screen, we only need the most important information:
The game name.
How to start the game.
The player can immediately understand what the game is and what to press.
The game-over screen needs to show two things:
The game has ended, for example Game Over.
The score, which is what players care about most.
So we prepare a score variable named score. Each time the player earns a point, score increases by 1. At the end of the game, we can display SCORE: followed by score.
Try different scale values and positions so the start and game-over screens do not overlap.
6. Design the Main Game Elements
- Draw the ball: The ball is the main character. Its position changes while the game runs, so each update needs to erase the old ball and draw the new one. Use the previous ball y position to cover the old ball with the background color, then draw the ball at its new position.
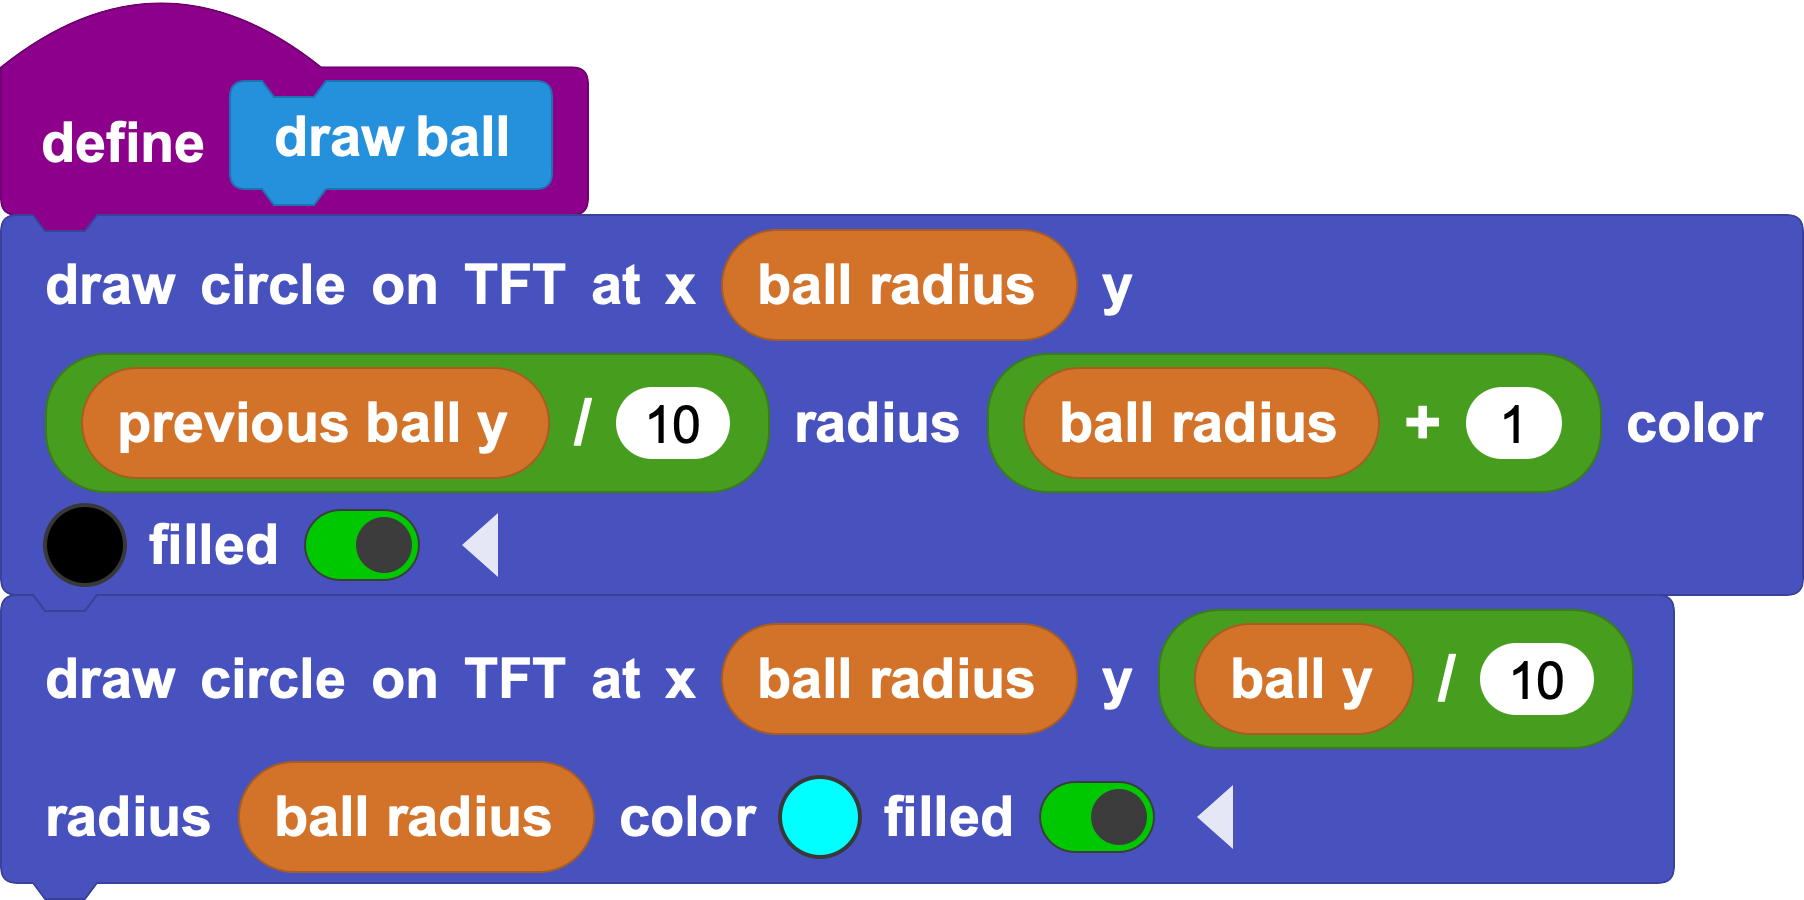
PS: Here, X ball radius means the ball stays near the left side of the screen. Its x coordinate stays mostly unchanged, while its y coordinate changes.
You may wonder how previous ball y and ball y are related. The ball needs to fall automatically when no button is pressed. Otherwise, it would float in the air.
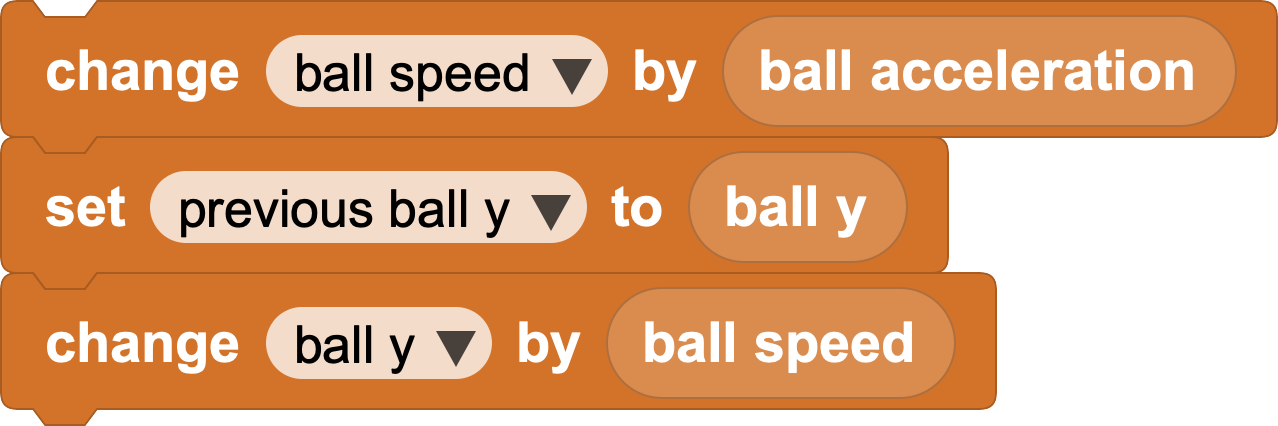
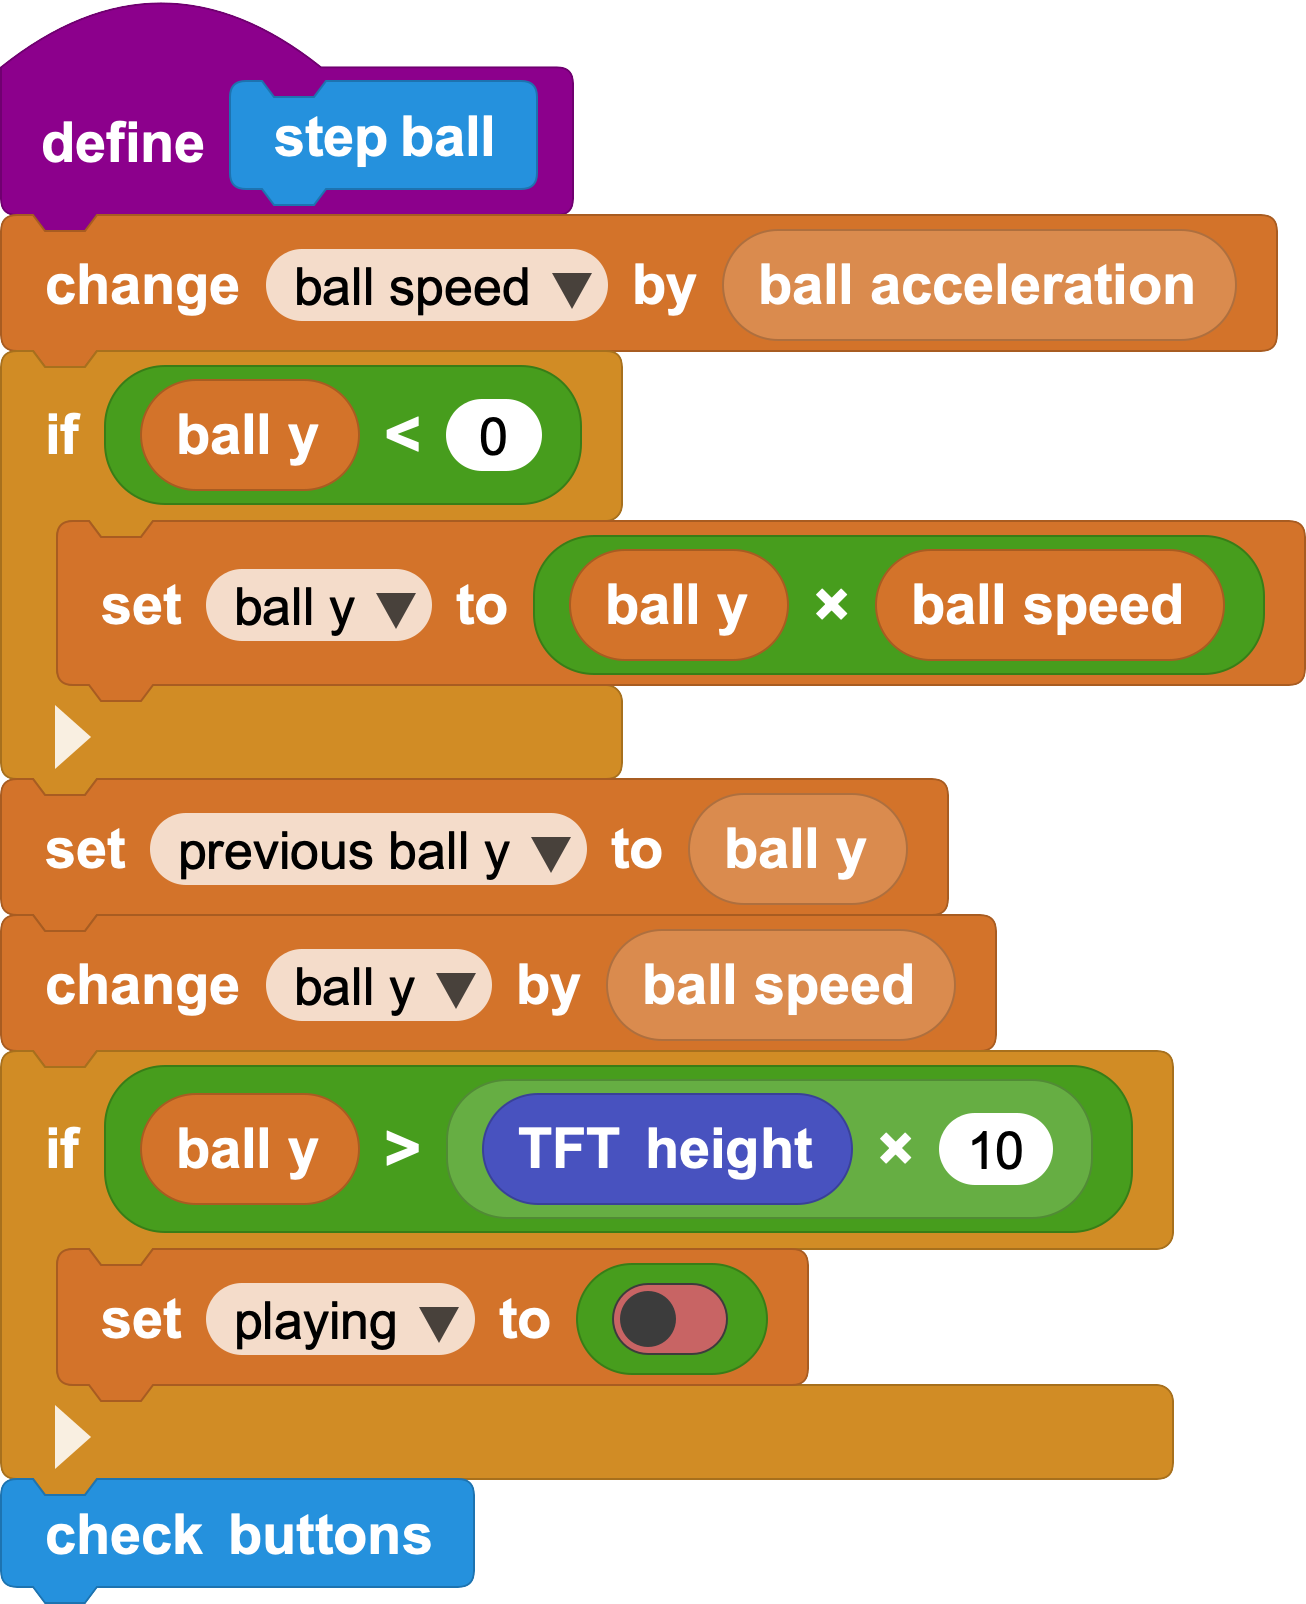
- Ball movement: In the real world, a ball falls faster and faster because of acceleration. In the game, we use two variables: acceleration and speed. Each frame updates the speed and then updates the ball position.

You can set the initial speed and acceleration yourself.
After the speed is updated, previous ball y stores the last frame's ball y:
When the player presses a button, the ball jumps up. We can set the speed to 0 and then use acceleration to move the ball upward. Because this action is independent, we make it a function:
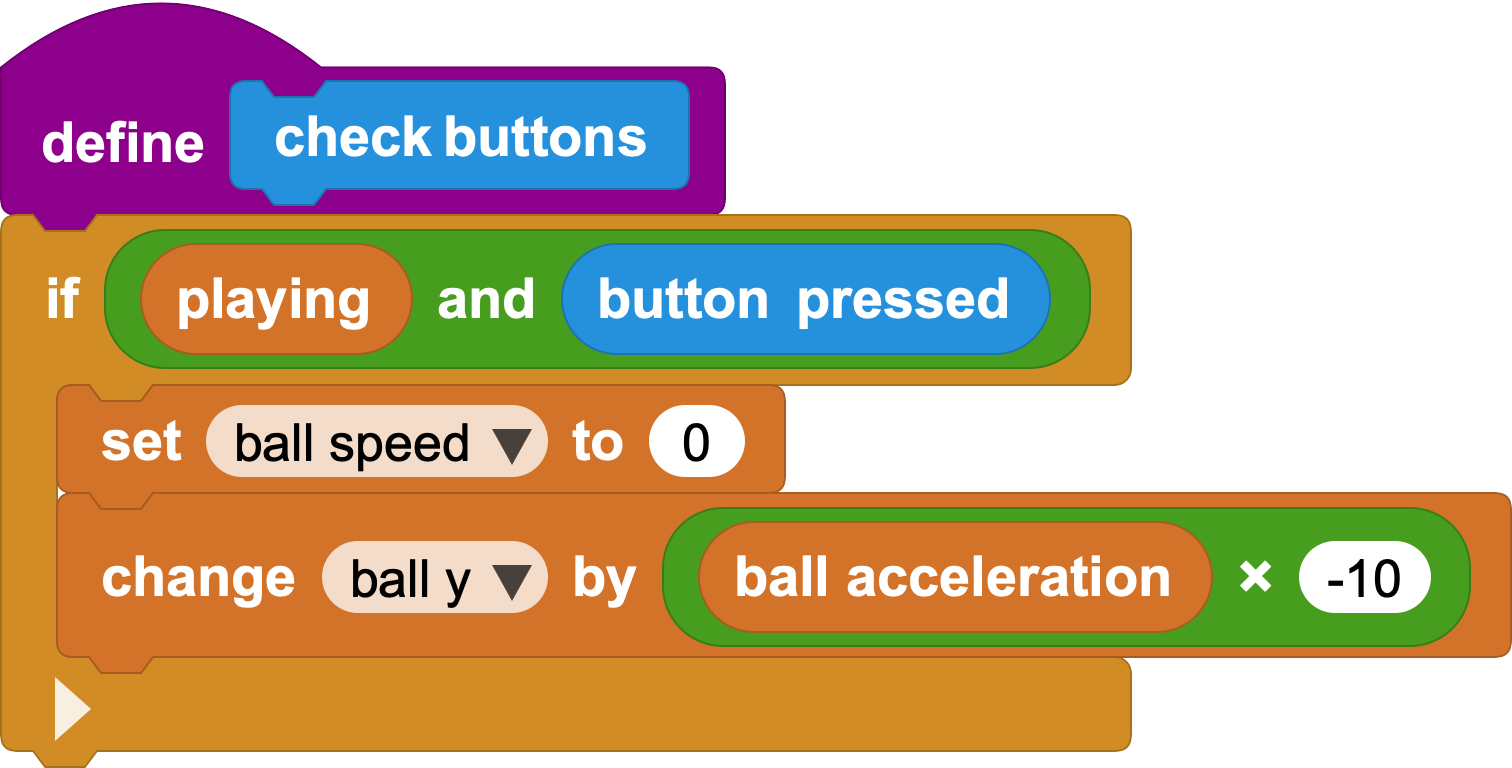
The button pressed block only checks whether a button is pressed. The playing variable is a Boolean variable that tells whether the game is still running. Together, they control the game rhythm.
If the player presses too quickly, the ball may fly out of the top of the screen. We choose to add a ceiling: when ball y becomes too small, force it back into the screen.
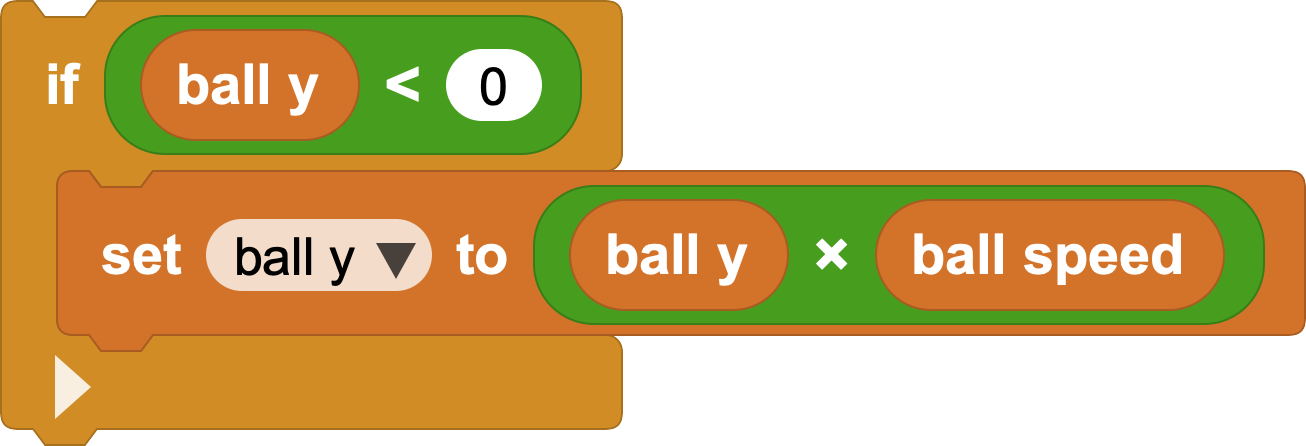
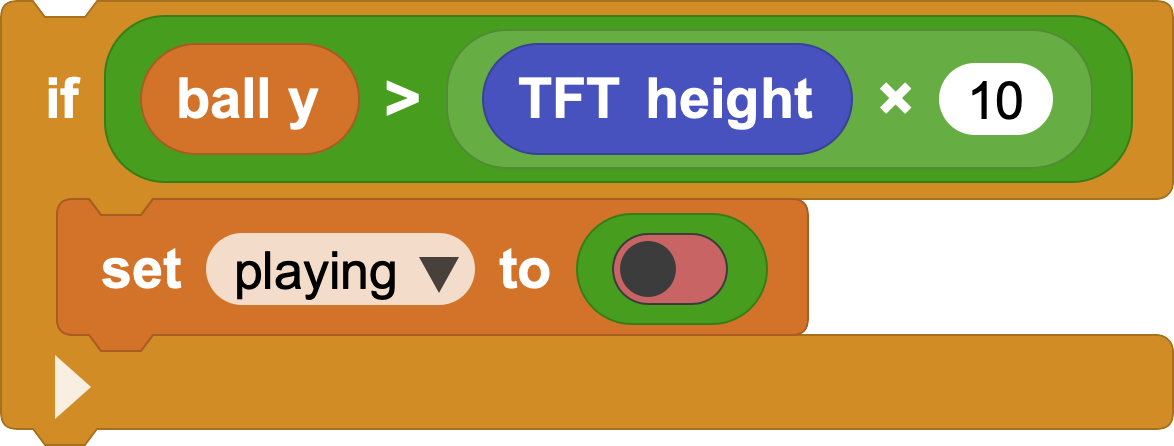
We also need to check whether the ball falls below the bottom of the screen. We can compare ball y with the screen height.
After these parts are complete, the ball's frame-by-frame movement can be grouped into a function named step ball:
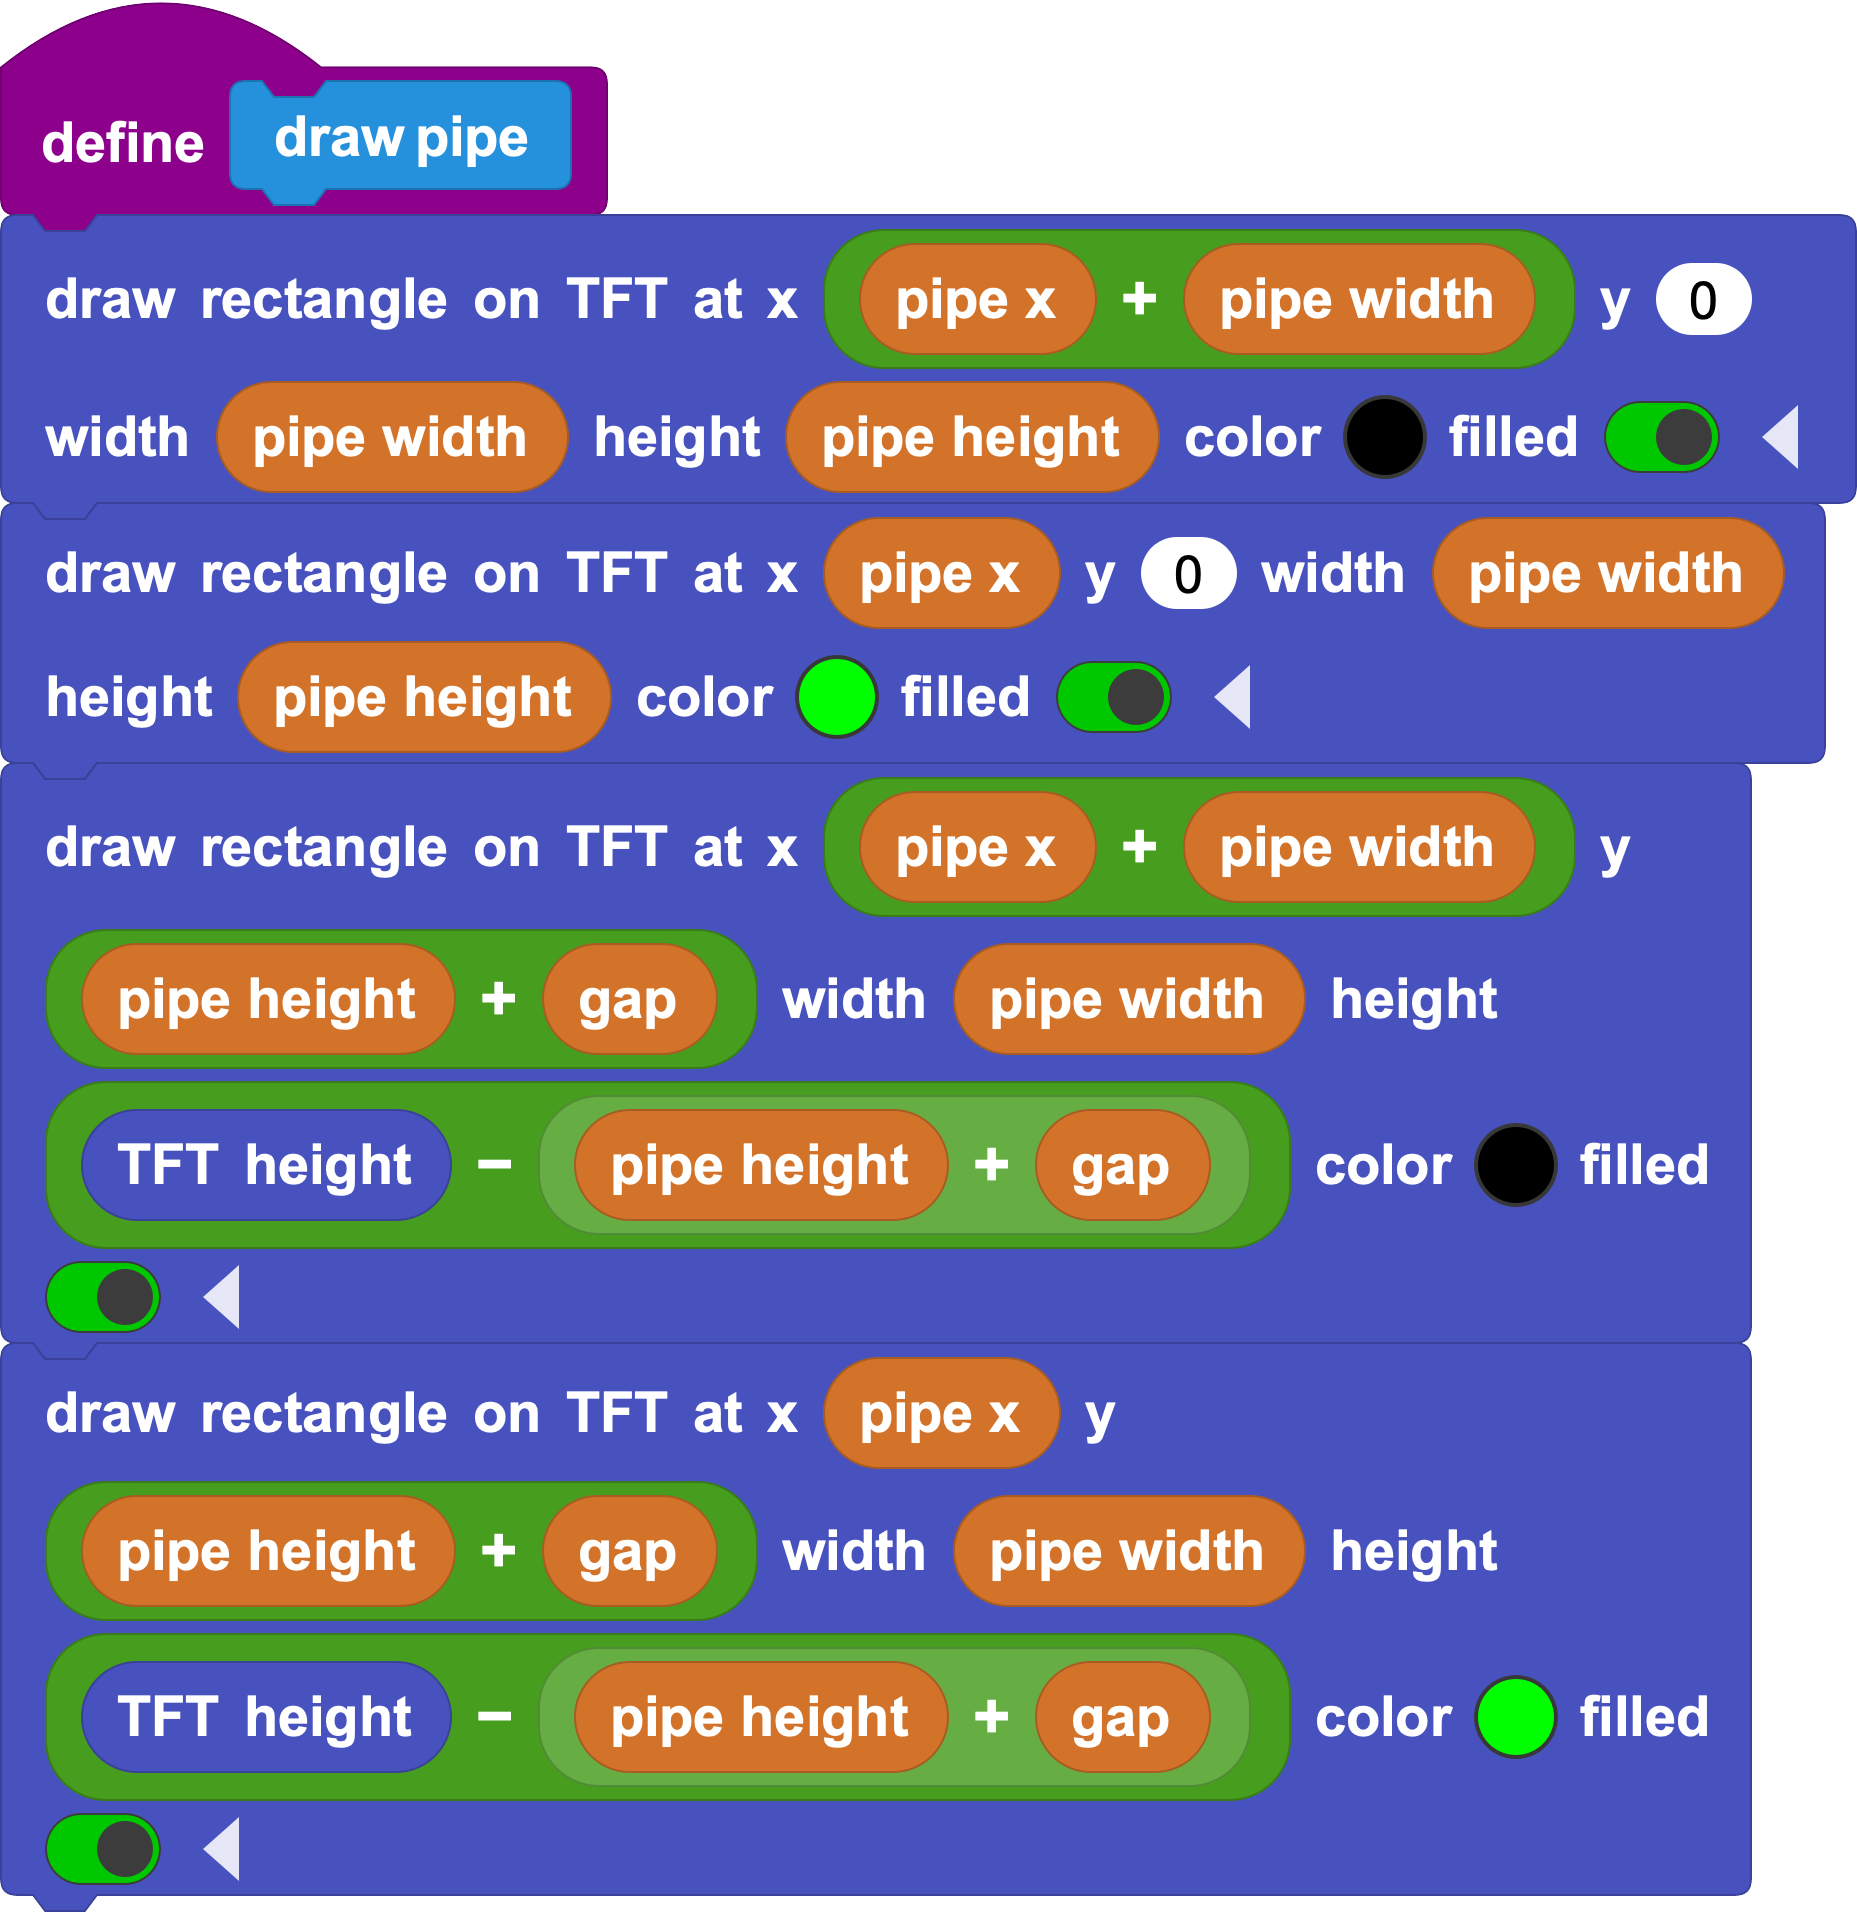
Draw the pipes:
The pipes are similar to the ball: we erase the old position and draw the new one. But a pipe is not one shape. It has a top part, a bottom part, and a gap between them.
We need to handle:
The position and height of the top pipe.
The position and height of the bottom pipe.
The gap between them, named gap.
The y values for the pipes are easy to determine using the screen height, the gap, and 0. The key to movement is pipe x. To make the pipe move left, pipe x must keep decreasing every frame.
Like the ball, pipe movement can also be divided by frame.
- First, move the pipe left at a fixed speed:

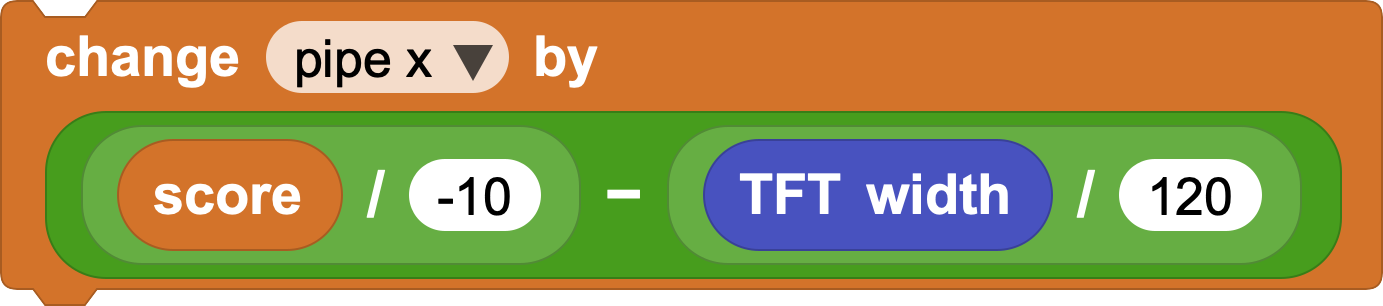
To make the game more interesting, the difficulty can increase as score gets higher. We can connect pipe x movement to score:
- When the pipe has moved far enough left, it has passed the player.
At that point, reset the pipe position and randomly generate a new height for the next challenge.
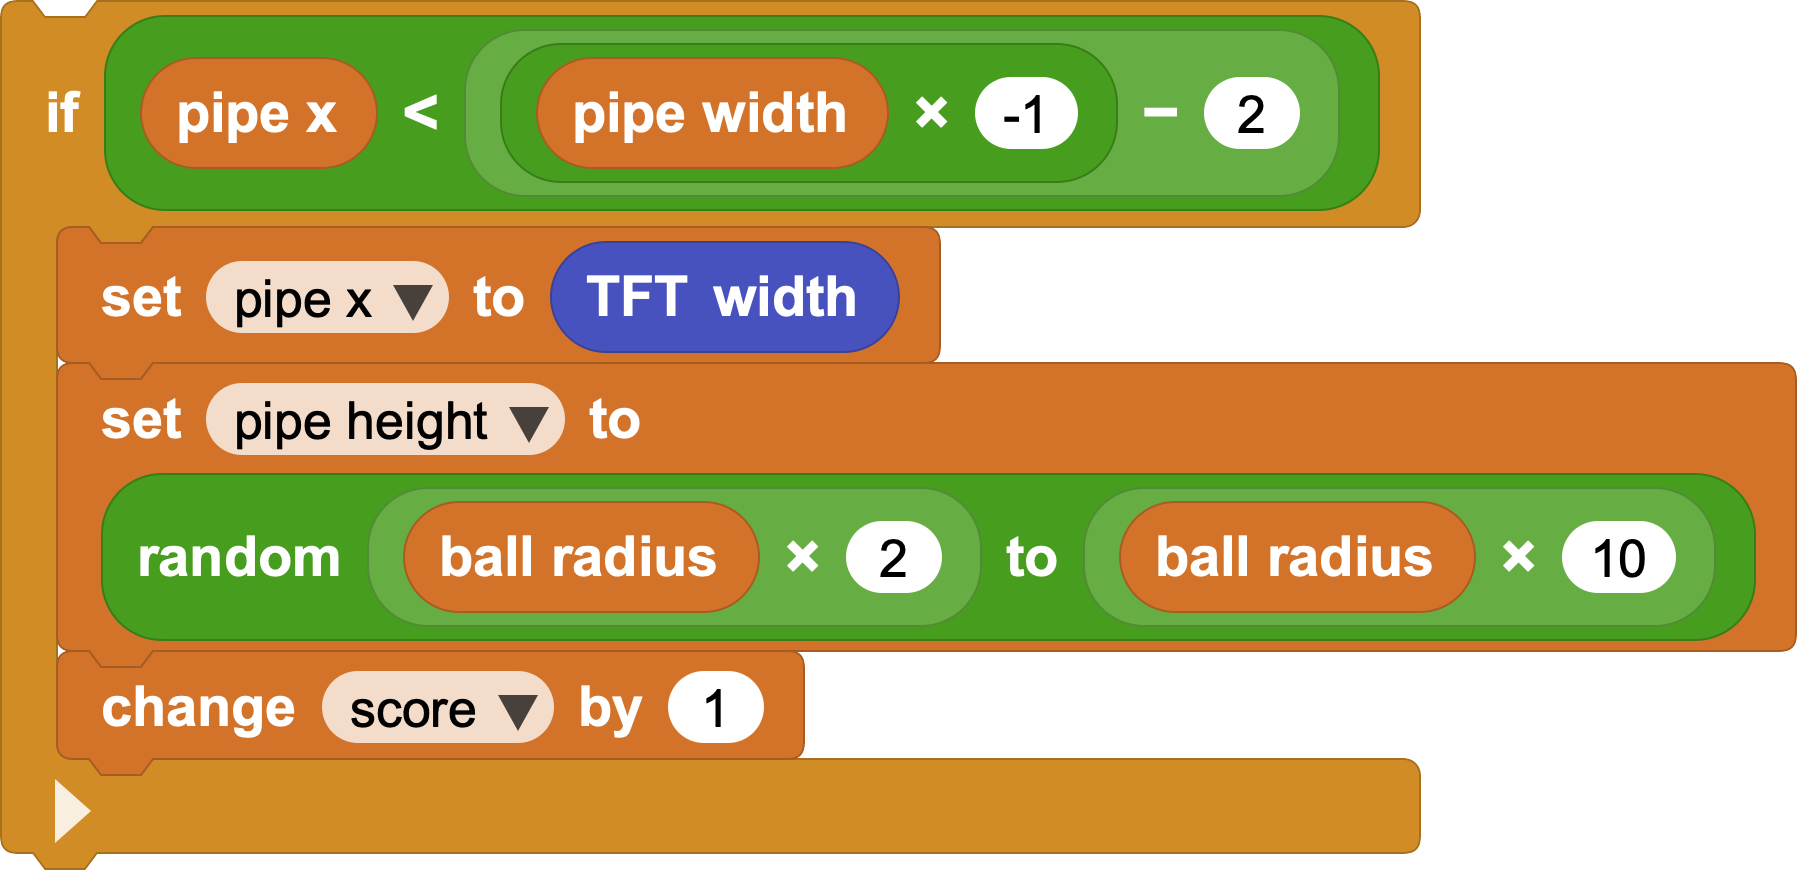
We can also create a step pipe block to describe the pipe's frame-by-frame movement:

- Collision detection: If the ball hits a pipe, the game ends. Since the ball stays near the left side and the pipes move, collision happens when the pipe reaches the left side.
The first condition is pipe x <= pipe width:

The second condition checks whether the ball hits the upper or lower edge of the gap:
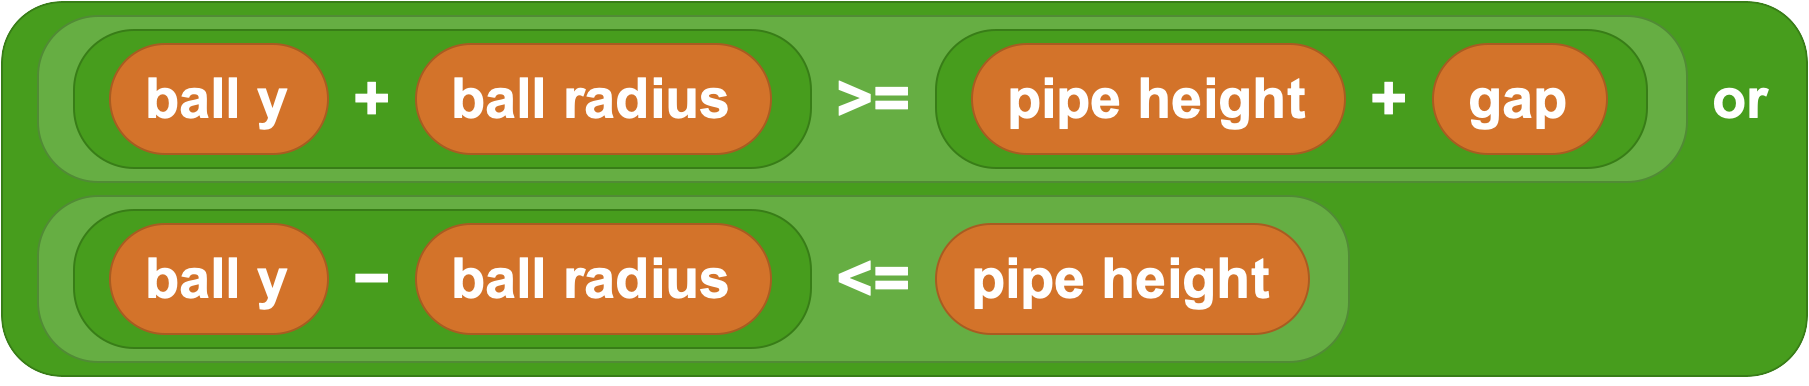
When both conditions are true, set playing to false to finish collision detection.
PS: Did you notice that calculations involving ball y often include / 10? At the start, we multiply ball y by 10 to get smoother movement using integers. When checking collisions or drawing, remember to divide by 10 to convert it back to the real screen position.
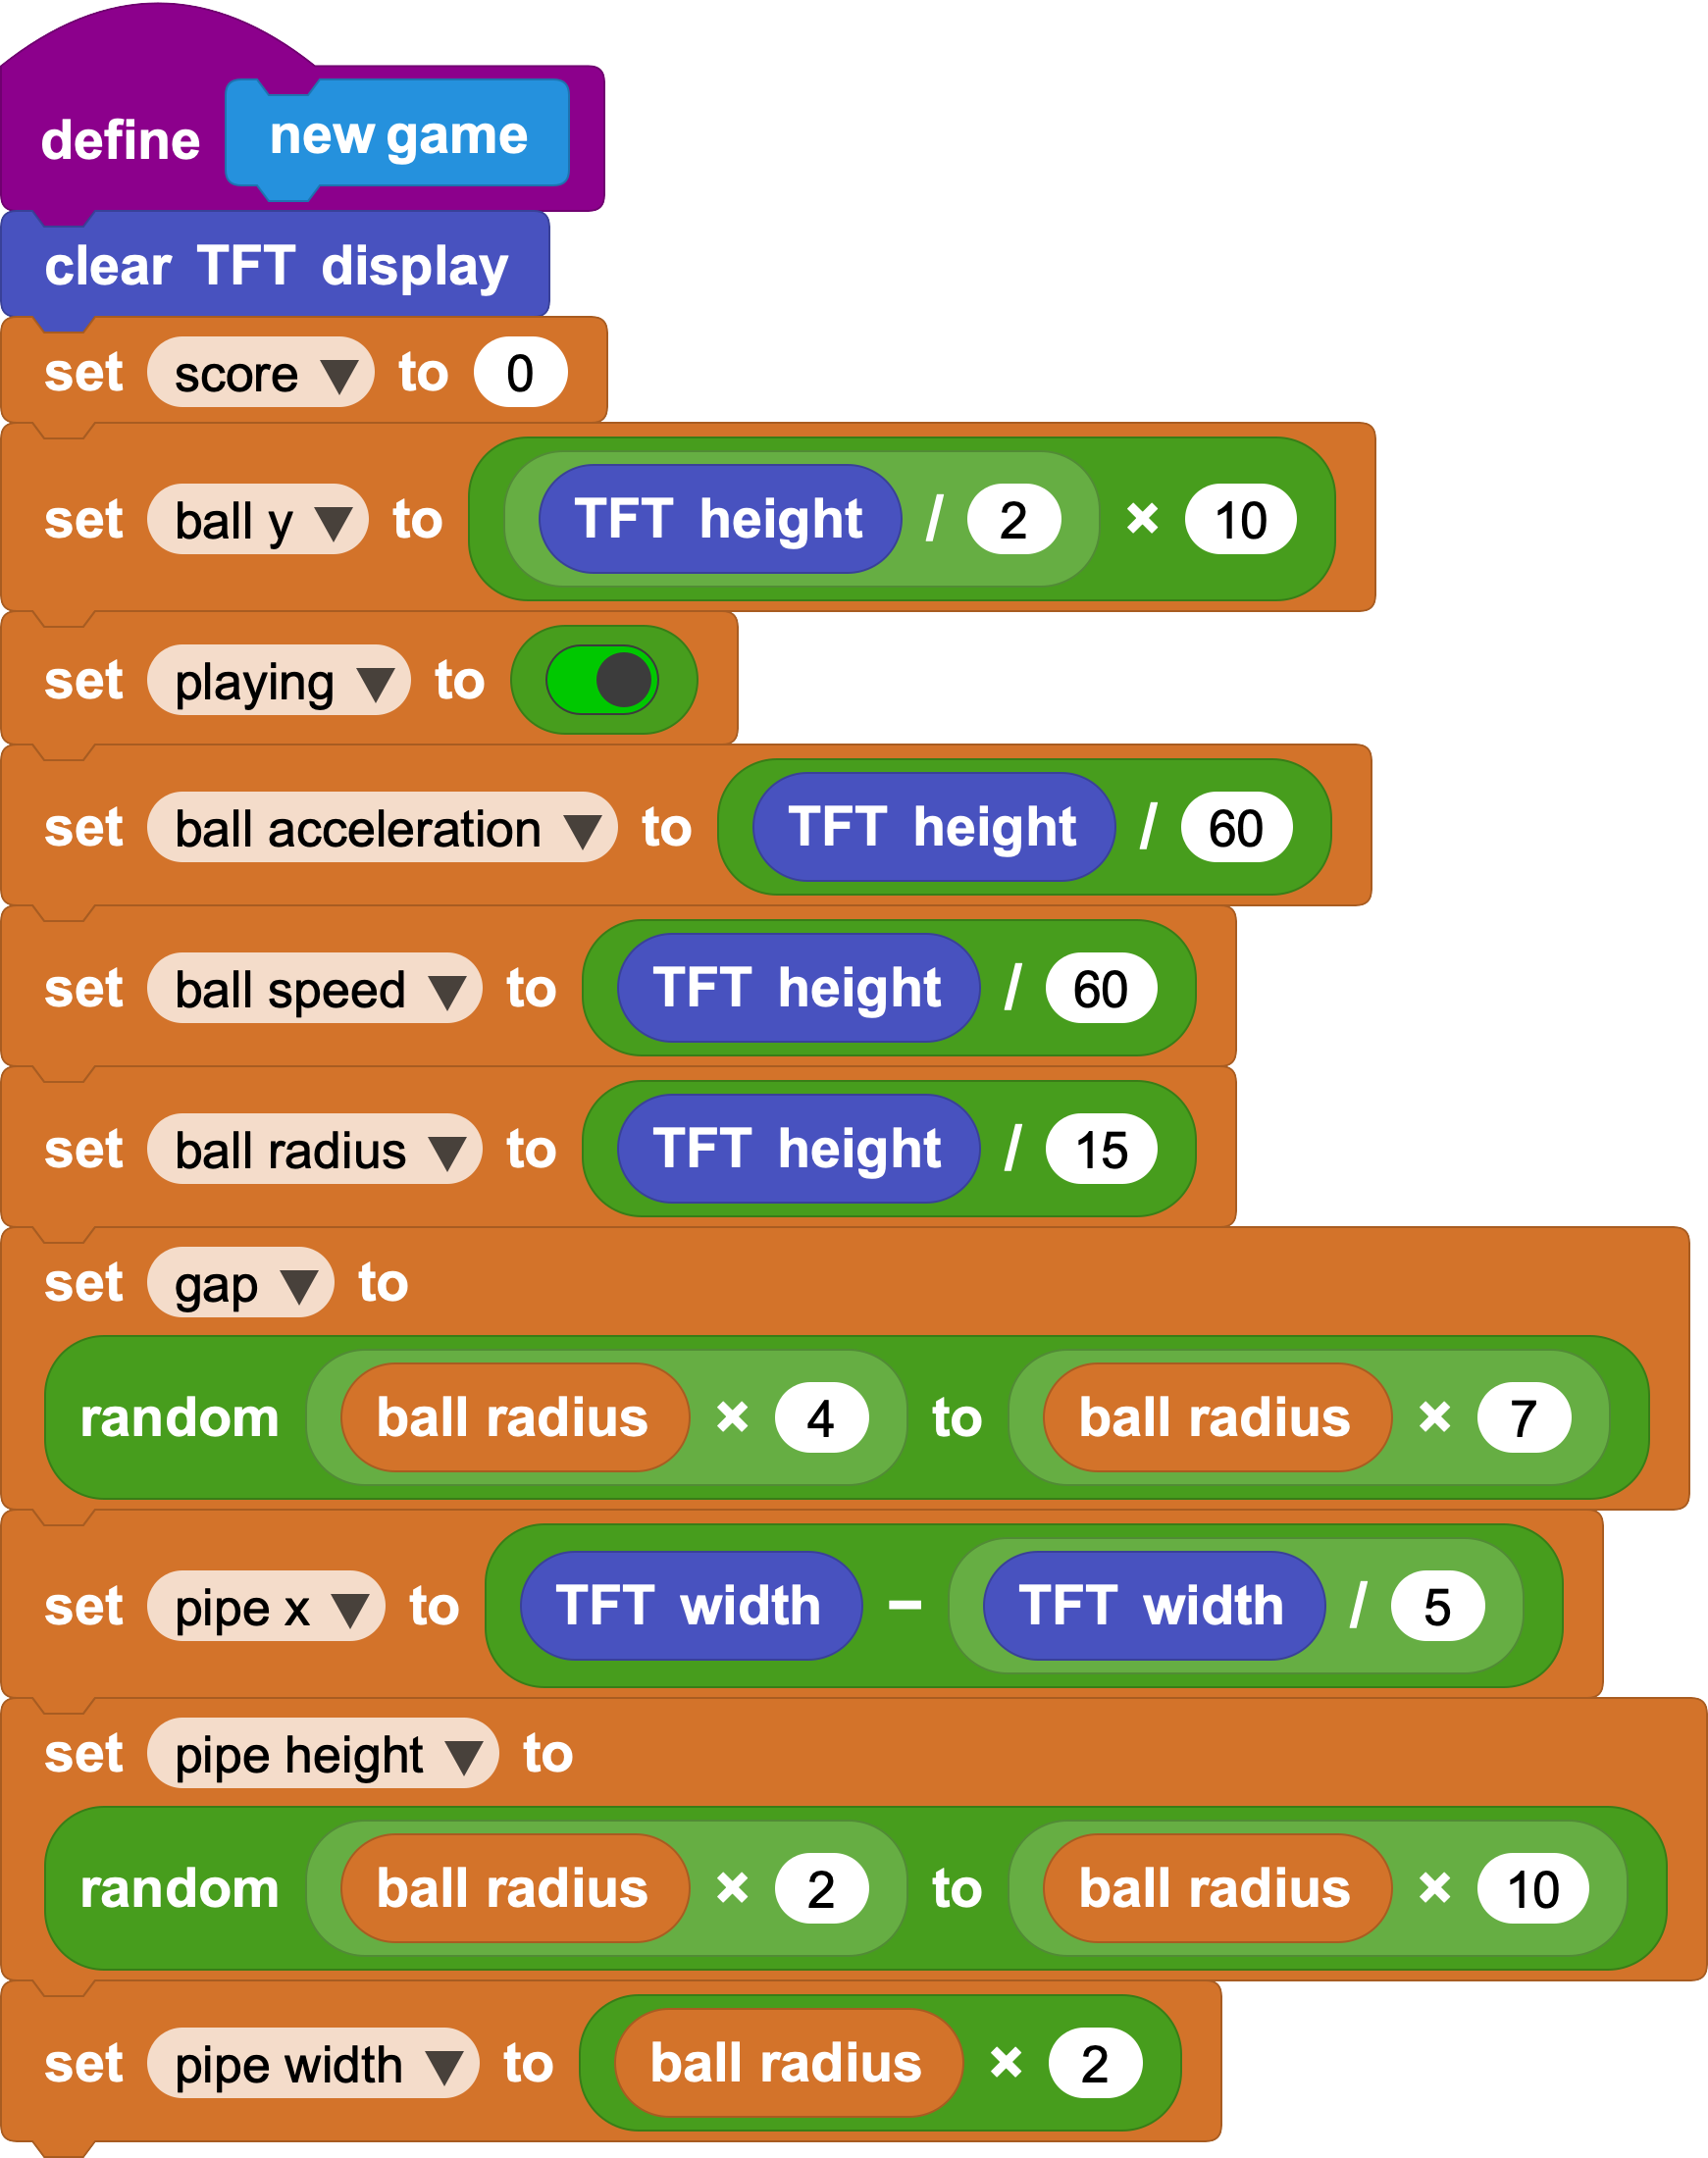
- Define initial variable values:
7. Challenge
You now have the main parts of a complete interactive game:
Variables -> movement -> boundary checks -> collision detection -> scoring -> screens -> improvements
Try building the program in MicroBlocks. A working version can be completed by connecting the blocks above: